Intro to Docker Swarm: Part 3 - Example Swarm SOA

A Docker Swarm SOA

One of the most exciting things that Docker Swarm brings to the table is the ability to create modern, resilient, and flexible architectures with very little overhead. Being able to interact with a heterogenious cluster of Docker hosts as if it were a single host enables the existing toolchains in use today to build everything we need to create a beautifully simple SOA!

This article is going to attempt to describe a full SOA architecture built around Docker Swarm that has the following properties:

  • A hypervisor layer composed of individual Docker hosts (Docker/Registrator)
  • A cluster layer tying the Docker hosts together (Docker Swarm)
  • A service discovery layer (Consul)
  • A routing layer to direct traffic based off of the services in Consul (HAProxy / Nginx)

Hypervisor Layer

The hypervisor layer is made up of a group of discrete Docker hosts. Each host has the services running on it that allows it to participate in the cluster:

  • Docker daemon: The Docker daemon is configured to listen on the network port in addition to the local Linux socket so that the Swarm daemon can communicate with it. In addition, each Dockerhost is configured to run with a set of tags that work with Swarm’s scheduler to define where containers are placed. They help describe the Docker host and is where any identifying information can be associated with the Docker host. This is an example of a set of tags a Docker host would be started with:

    • zone: application/database
    • disk: ssd/hdd
    • env: dev/prod
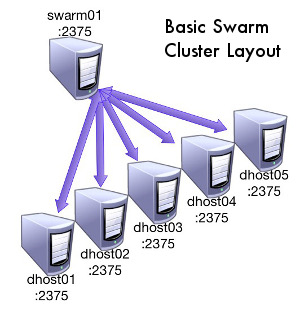
  • Swarm daemon: The Swarm client daemon is run alongside the Docker daemon in order to keep the node in the Swarm cluster. This Swarm daemon is running in join mode and basically heartbeats to Consul to keep its record updated in the /swarm location. This record is what the Swarm master uses to create the cluster. If the daemon were to die the list in Consul should be updated to automatically to remove the node. The Swarm client daemon would use a path in Consul like /swarm and it would contain a list of the docker hosts:

    View of Swarm cluster in Consul

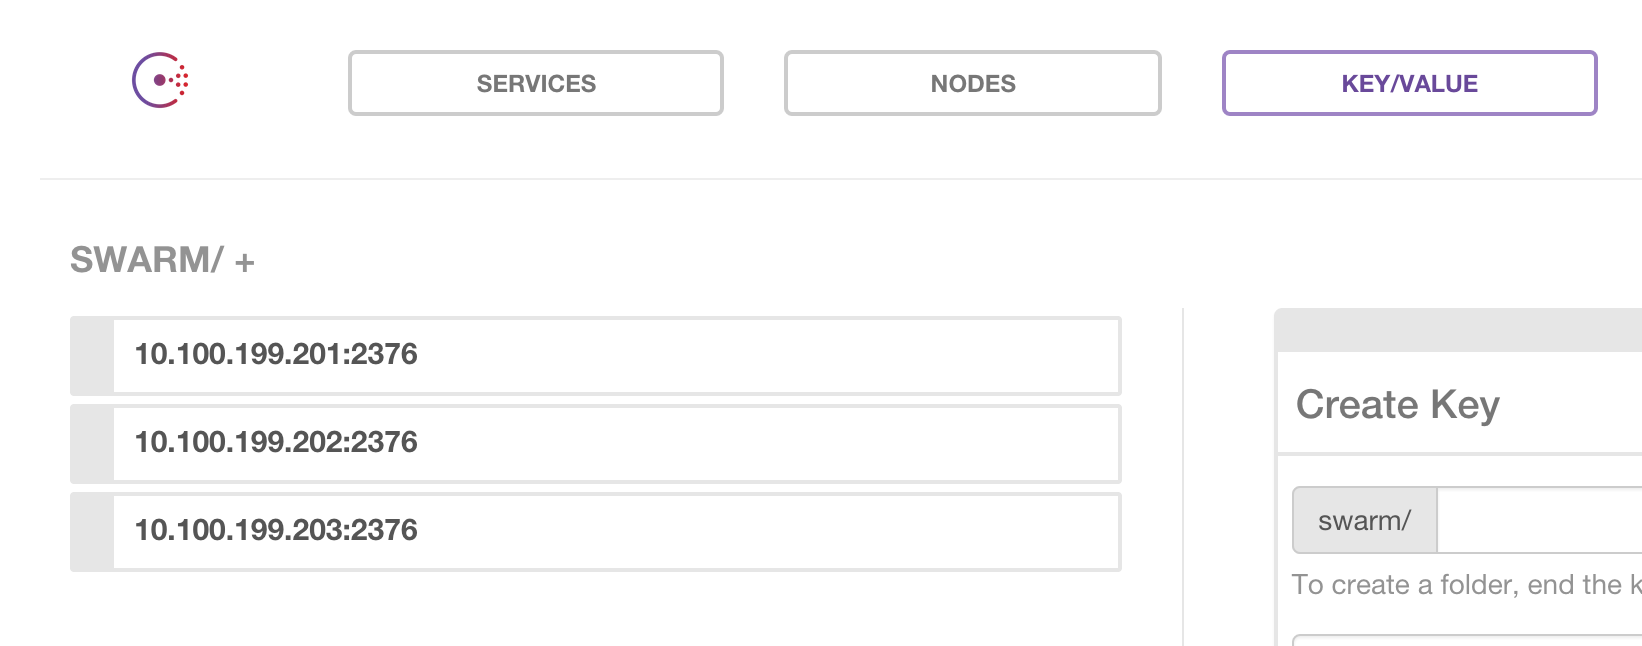
  • Registrator daemon: The Registrator app1 is what will be updating Consul when a container is created or destroyed. It listens to the Docker socket and upon each event will update the Consul key/value store. For example, an app named deepthought that requires 3 instances on separate hosts and that is running on port 80 would create a structure in Consul like this:
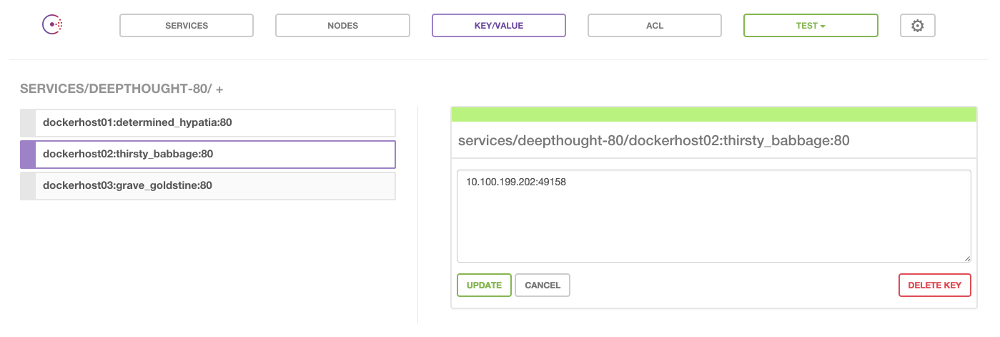
    View of Services in Consul

    The pattern being:

    /services/<service>-<port>/<dhost>:<cname>:<cport> value: <ipaddress>:<cport>

    • service: The name of the container’s image
    • port: The container’s exposed port
    • dhost: The Docker host that the container is running on
    • cport: The Container’s exposed port
    • ipaddress: The ipaddress of the Docker host running the container

    The output of a docker ps for the above service looks like so:

  $ docker ps
  CONTAINER ID        IMAGE                       COMMAND                CREATED             STATUS              PORTS                                   NAMES
  097e142c1263        mbajor/deepthought:latest   "nginx -g 'daemon of   17 seconds ago      Up 13 seconds       10.100.199.203:49166->80/tcp   dockerhost03/grave_goldstine
  1f7f3bb944cc        mbajor/deepthought:latest   "nginx -g 'daemon of   18 seconds ago      Up 14 seconds       10.100.199.201:49164->80/tcp   dockerhost01/determined_hypatia
  127641ff7d37        mbajor/deepthought:latest   "nginx -g 'daemon of   20 seconds ago      Up 16 seconds       10.100.199.202:49158->80/tcp   dockerhost02/thirsty_babbage
  

This is the most basic way to record the services and locations. Registrator also supports passing metadata along with the container that includes key information about the service2.

Another thing to mention is that it seems the author of Registrator intends the daemon to be run as a Docker container. Since a Docker Swarm cluster is meant to be treated as a single Docker host, I prefer the idea of running the Registrator app as a daemon on the Docker hosts themselves. This allows a state on the cluster in which 0 containers are running and the cluster is still alive. It seems like a very appropriate place to draw the line between platform and applications.

Cluster Layer

At this layer we have the Docker Swarm master running. It is configured to read from Consul’s key/value store under the /swarm prefix and it generates its list of nodes from that information. It also is what listens for client connections to Docker (create, delete, etc..) and routes those requests to the proper backend Docker host. This means that it has the following requirements:

  • Listening on the network
  • Able to communicate with Consul
  • Able to communicate with all of the Docker daemons

As of yet I have yet to see mention of making the Swarm daemon itself HA, but after working with it there really do not seem to be any reasons that it could not be. I expect that a load balancing proxy with TCP support (HAproxy) could be put in front of a few Swarm daemons with relative ease. Sticky sessions would have to be enabled and possibly an active/passive if there are state synchronization issues between multiple Swarm daemons, but it seems like it would be doable. Since the containers do continue to run and are accessible even in the case of a Swarm failure we are going to accept the risk of a non-ha Swarm node over the complexity and overhead of loadbalancing the nodes. Tradeoffs right?

Service Discovery Layer

The service discovery layer is run on a cluster of Consul nodes; specifically it’s key/value store. In order to maintain quorum (n/2 + 1 nodes) even in the case of a failure there should be an odd number of nodes. Consul has a very large feature set3 including auto service discovery, health checking, and a key/value store to name a few. We are only using the key/value store, but I would expect there are benefits to incorporating the other aspects of Consul into your architecture. For this example configuration, the following processes are acting on the key/value store:

  • The Swarm clients on the Docker hosts will be registering themselves in /swarm
  • The Swarm master will be reading /swarm in order to build its list of Docker hosts
  • The Registrator daemon will be taking nodes in and out of the /services prefix
  • Consul-template will be reading the key/value store to generate the configs for the routing layer

This is the central datastore for all of the clustering metadata. Consul is what ties the containers on the Docker hosts to the entries in the routing backend.

Consul also has a GUI that can be installed in addition to everything else and I highly recommend installing it for development work. It makes figuring out what has been registered and where much easier. Once the cluster is up and running you may have no more need for it though

Routing Layer

This is the edge layer and what all external application traffic will run through. These nodes are on the edge of the Swarm cluster and are statically IP’d and have DNS entries that can be CNAME’d to for any services run on the cluster. These nodes listen on port 80/443 etc.. and have the following services running:

  • Consul-template: This daemon is polling Consul’s key/value store (under /services and when it detects a change, it writes a new HAProxy/Nginx config and gracefully reloads the service. The templates are written in Go templating and the output should be in standard HAProxy or Nginx form.

  • HAProxy or Nginx: Either of these servers are fully battle proven and ready for anything that is needed, even on the edge. The service is configured dynamically by Consul-template and reloaded when needed. The main change that happens frequently is the modification of a list of backends for a particular vhost. Since the list is maintained by what is actually alive and in Consul it changes as frequently as the containers do.

This is a high level overview of a Docker Swarm cluster that is based on an SOA. In the next post I will demonstrate a working infrastructure as described above in a Vagrant environment. This post will be coming after our Docker Denver Meetup4 so stay tuned (or better yet, come to the Meetup for the live demo)!

All of the research behind these blog posts was made possible due to the awesome company I work for: Rally Software in Boulder, CO. We get at least 1 hack week per quarter and it enables us to hack on awesome things like Docker Swarm. If you would like to cut to the chase and directly start playing with a Vagrant example, here is the repo that is the output of my Q1 2014 hack week efforts:

  1. https://github.com/progrium/registrator 

  2. https://github.com/progrium/registrator#single-service-with-metadata 

  3. http://www.consul.io/docs/index.html 

  4. http://www.meetup.com/Docker-Denver/events/218859311/ 

Intro to Docker Swarm: Part 2 - Configuration Options and Requirements

Minimum Requirements to run a Docker Swarm Cluster

The minimum requirements are minimal indeed to create a Docker Swarm cluster. In fact, it is definitely feasible (though perhaps not best practice) to run the Swarm daemon on an existing Docker Host making it possible to implement it without adding any more hardware or virtual resources. In addition, when running the file or nodes1 based discovery mechanism there is no other infrastructure (besides of course Docker) that is required to run a basic Docker Swarm cluster.

I personally believe that spinning up another machine to run the Swarm master itself is a good idea. The machine does not have to be heavy in resources, but it does need to have a lot of file descriptors to handle all of the tcp connections coming and going. In the examples, I use dockerswarm01 as a dedicated Swarm master.

Configuration Options

There are a variety of configuration settings in Swarm that are sane by default, but give a lot of flexibility when it comes to running the daemon and its supporting infrastructure. Listed below are the different categories of config options and the options of how they can be configured.

Discovery

Discovery is the mechanism Swarm uses in order to maintain the status of the cluster. It can operate with a variety of backends, but it’s all pretty much the same concept:

  • The backend maintains a list of Docker nodes that should be part of the cluster.
  • Using the list of nodes, Swarm healtchecks each one and keeps track of the nodes that are in and out of the cluster

Node Discovery

Node discovery requires that everything be passed in on the command line. This is the most basic type of discovery mechanism as it requires no maintenance of config files or anything like that. An example startup command for the Swarm daemon using node discovery would look like:

swarm manage \
  --discovery dockerhost01:2375,dockerhost02:2375,dockerhost03:2375 \
  -H=0.0.0.0:2375

File Discovery

File discovery utilizes a configuration file placed on the filesystem (ie: /etc/swarm/cluster_config) with the format of <IP>:<Port> to list the Docker hosts in the cluster. Even though the list is static, healthchecking is used to determine the list of healthy and unhealthy nodes and filter requests going to the unhealthy nodes. An example of a file based discovery startup line and configuration file would be:

swarm manage \
  --discovery file:///etc/swarm/cluster_config \
  -H=0.0.0.0:2375
#/etc/swarm/cluster_config
dockerhost01:2375
dockerhost02:2375
dockerhost03:2375

Consul Discovery

Consul discovery is also supported out of the box by Docker Swarm. It works by utilizing Consul’s key value store to keep it’s list of <IP>:<Port>’s used to form the cluster. In this configuration mode, each Docker host runs a Swarm daemon in join mode that is pointed at the Consul cluster’s HTTP interface. This provides a little overhead to the configuration, runtime, and security of a Docker host, but not a significant amount. The Swarm client would be fired up as such:

Hashicorp Consul Logo

swarm join \
  --discovery consul://consulhost01/swarm \
  # This can be an internal IP as long as the other
  # Docker hosts can reach it.
  --addr=10.100.199.200:2375

The Swarm master then reads it’s host list from Consul. It would be run with a startup line of:

swarm manage \
  --discovery consul://consulhost01/swarm \
  -H=0.0.0.0:2375

These key/value based configuration modes raise the question of how healthchecks within Swarm work in combination with the Swarm client in join mode. Since the list in key/value store is itself dynamic, is it required to run the internal Swarm healthchecks too? I’m not familiar with that area of functionality and so can’t speak to it but it’s worth noting.

EtcD Discovery

EtcD discovery works in much the same way as Consul discovery. Each Docker host in the cluster runs a Swarm daemon in join mode pointed at an EtcD endpoint. This provides a heartbeat to EtcD to maintain a list of active servers in the cluster. A Docker host running the standard Docker daemon would concurrently run a Swarm client with a configuration similar to:

EtcD Logo

swarm join \
  --discovery etcd://etcdhost01/swarm \
  --addr=10.100.199.200:2375

The Docker Swarm master would connect to EtcD, look at the path provided, and generate it’s list of nodes by starting with the following command:

swarm manage \
  --discovery etcd://etcdhost01/swarm \
  -H=0.0.0.0:2375

Zookeeper Discovery

Zookeeper discovery follows the same pattern as the other key/value store based configuration modes. A ZK ensemble is created to hold the host list information and a client runs alongside Docker in order to heartbeat in to the k/v store; maintaining the list in near real-time. The Swarm master is also connected to the ensemble and uses the information under /swarm to maintain its list of hosts (which it then healthchecks).

Apache Logo

Swarm Client (alongside Docker):

swarm join \
  # All hosts in the ensemble should be listed
  --discovery zk://zkhost01,zkhost02,zkhost03/swarm \
  --addr=10.100.199.200

Swarm Master:

swarm manage \
  --discovery zk://zkhost01,zkhost02,zkhost03/swarm \
  -H 0.0.0.0:2375

Hosted Token Based Discovery (default)

I have not used this functionality and at this point have very little reason to.

Scheduling

Scheduling is the mechanism for choosing where a container should be created and started. It is made up of a combination of a packing algorithm and filters (or tags). Each Docker daemon is started with a set of tags like this:

docker -d \
  --label storage=ssd \
  --label zone=external \
  --label tier=data \
  -H tcp://0.0.0.0:2375

Then when a Docker container is started Swarm will choose a group of machines based on the filters, and then distributes each run command according to its scheduler. Filters tell Swarm where a container can and cannot run, while the scheduler places it amongst the available hosts. There are a few filtering mechanisms:

  • Constraint: This utilizes the tags that a Docker daemon was starting with. Currently it supports only ‘=’, but at some point in the future it may support ‘!=’. A node must match all of the constraints provided by a container in order to fit into scheduling. Starting a container with a few constraints would look like:
  docker run -d -P \
    -e constraint:storage=ssd \
    -e constraint:zone=external \
    -t nginx
  
  • Affinity: Affinity can work in two ways: affinity to containers or affinity to images. In order to start two containers on the same host the following command would be run:
  docker run -d -P \
    --name nginx \
    -t nginx

   docker run -d -P \
     --name mysql \
     -e affinity:container=nginx \
     -t mysql
  

Since Swarm does not handle image management, it is also possible to set affinity for an image. This means a container will only be started on a node that already contains the image. This negates the need to wait for an image to be pulled in the background before starting a container. An example:

  docker run -d -P \
    --name nginx \
    -e affinity:image=nginx \
    -t nginx
  
  • Port: The port filter will not allow any two containers with the same static port mapping to be started on the same host. This makes a lot of sense as you cannot duplicate a port mapping on a Dockerhost. For example, two nodes started with -p 80:80 will not be allowed to run on the same Dockerhost.

  • Healthy: This prevents the scheduling of containers on unhealthy nodes.

Once Swarm has narrowed the host list down to a set that matches the above filters, it then schedules the container on one of the nodes. Currently the following schedulers are built in:

  • Random: Randomly distribute containers across available backends.
  • Binpacking: Fill up a node with containers and then move to the next. This mode has the increased complexity of having to assign static resource amounts to each container at runtime. This means setting a limit on a container’s memory and cpu which may or may not seem OK. I personally like letting the containers fight amongst themselves to see who gets the resources.

In progress are the balanced strategy2 and the ability to add Apache Mesos3.

TLS

I am happy to say that Swarm works with TLS enabled. This makes it more secure between both the client and Swarm daemon as well as between the Swarm daemon and the Docker daemons. This is good because my security guy says that there are no more borders in networks. Yey.

SSL Logo

It does require a full PKI including CA, but I have this solved in another post already :) This is how to generate the required TLS certs for Docker and Swarm.

Once the certificates have been generated and installed as per my other blog post, the Docker and Swarm daemons can be fired up like this:

Docker:

docker -d \
  --tlsverify \
  --tlscacert=/etc/pki/tls/certs/ca.pem \
  --tlscert=/etc/pki/tls/certs/dockerhost01-cert.pem \
  --tlskey=/etc/pki/tls/private/dockerhost01-key.pem \
  -H tcp://0.0.0.0:2376

Swarm master:

swarm manage \
  --tlsverify \
  --tlscacert=/etc/pki/tls/certs/ca.pem \
  --tlscert=/etc/pki/tls/certs/swarm-cert.pem \
  --tlskey=/etc/pki/tls/private/swarm-key.pem  \
  --discovery file:///etc/swarm_config \
  -H tcp://0.0.0.0:2376

Then the client must know to connect via TLS. This is done with the following environment variables:

export DOCKER_HOST=tcp://dockerswarm01:2376
export DOCKER_CERT_PATH="`pwd`"
export DOCKER_TLS_VERIFY=1

You are now setup for TLS. WCGW? SSL Logo

More to come!

Well there is a lot to talk about when it comes to configuration of complex clustered software, but I feel this is a good enough overview to get you up and running and thinking about how to configure your Swarm cluster. In the next episode I’ll lay out some example architectures for your Swarm cluster. Stay tuned and please feel free to comment below!

All of the research behind these blog posts was made possible due to the awesome company I work for: Rally Software in Boulder, CO. We get at least 1 hack week per quarter and it enables us to hack on awesome things like Docker Swarm. If you would like to cut to the chase and directly start playing with a Vagrant example, here is the repo that is the output of my Q1 2014 hack week efforts:

  1. https://github.com/docker/swarm/tree/master/discovery#using-a-static-list-of-ips 

  2. https://github.com/docker/swarm/pull/227 

  3. https://github.com/docker/swarm/issues/214 

Intro to Docker Swarm: Part 1 - Overview

What is Docker Swarm?

Docker Swarm1 is a utility that is used to create a cluster of Docker hosts that can be interacted with as if it were a single host. I was introduced to it a few days before it was announced at DockerCon EU2 at the Docker Global Hack Day3 that I participated in at work. During the introduction to hackday, a few really cool new technologies were announced4 including Docker Swarm, Docker Machine, and Docker Compose. Since Ansible fills the role of Machine and Compose, Swarm stuck out as particularly interesting to me.

Docker Global Hack Day 2014

Victor Vieux and Andrea Luzzardi announced the concept and demonstrated the basic workings of Swarm during the intros and made a statement that I found to be very interesting. They said that though the POC (proof of concept) was functional and able to demo, they were going to throw away all of that code and start from scratch. I thought that was great and try to keep that in mind when POC’ing a new technology.

The daemon is written in Go and at this point in time latest commit a0901ce8d6 is definitely Alpha software. Things are moving at a very rapid pace at this point in time and functionality + feature set vary almost daily. That being said, @vieux is extremely responsive with adding functionality and fixing bugs via GitHub Issues5. I would not recommend using it in production yet, but it is a very promising technology.

How does it work

Interacting with and operating Swarm is (by-design) very similar to dealing with a single Docker host. This allows interoperability with existing toolchains without having to make too many modifications (the major ones being splitting builds off of the Swarm cluster). Swarm is a daemon that is run on a Linux machine bound to a network interface on the same port that a standalone Docker instance (http/2375 or https/2376) would be. The Swarm daemon accepts connections from the standard Docker client >=1.4.0 and proxies them back to the Docker daemons configured behind Swarm which are also listening on the standard Docker ports. It can distribute the create commands based on a few different packing algorithms in combination with tags that the Docker daemons have been started with. This makes the creation of a partitioned cluster of heterogeneous Docker hosts that is exposed as a single Docker endpoint extremely simple.

Interacting with Swarm is ‘more or less’ the same as interacting with a single non-clustered Docker instance, but there are a few caveats. There is not 1-1 support for all Docker commands. This is due to both architectural and time based reasons. Some commands are just not implemented yet and I would imagine some might never be. Right now almost everything needed for running containers is available, including (amongst others):

  • docker run
  • docker create
  • docker inspect
  • docker kill
  • docker logs
  • docker start

This subset is the essential part of what is needed to begin playing with the tool in runtime. Here is an overview of how the technologies are used in the most basic configuration:

  • The Docker hosts are brought up with --label key=value listening on the network.
  • The Swarm daemon is brought up and pointed at a file containing a list of the Docker hosts that make up the cluster as well the ports they are listening on.
  • Swarm reaches out to each of the Docker hosts and determines their tags, health, and amount of resources in order to maintain a list of the backends and their metadata.
  • The client interacts with Swarm via it’s network port (2375). You interact with Swarm the same way you would with Docker: create, destroy, run, attach, and get logs of running containers amongst other things.
  • When a command is issued to Swarm, Swarm:
    • decides where to route the command based off of the provided constraint tags, health of the backends, and the scheduling algorithm.
    • executes the command against the proper Docker daemon
    • returns the result in the same format as Docker does

Basic Docker Swarm Diagram

The Swarm daemon itself is only a scheduler and a router. It does not actually run the containers itself meaning that if Swarm goes down, the containers it has provisioned are still up on the backend Docker hosts. In addition, since it doesn’t handle any of the network routing (network connections need to be routed directly to the backend Docker host) running containers will still be available even if the Swarm daemon dies. When Swarm recovers from such a crash, it is able to query the backends in order to rebuild its list of metadata.

Due to the design of Swarm, interaction with Swarm for all runtime activities is just about the same as it would be for other Docker daemon: the Docker client, docker-py, docker-api gem, etc.. Build commands have not yet been figured out, but you can get by for runtime today. Unfortunately at this exact time Ansible does not seem to work with Swarm in TLS mode6, but it appears to affect the Docker daemon itself not just Swarm.

This concludes the 1st post regarding Docker Swarm. I apologize for the lack of technical detail, but it will be coming in subsequent posts in the form of architectures, snippets, and some hands-on activities :) Look out for Part 2: Docker Swarm Configuration Options and Requirements coming soon!

All of the research behind these blog posts was made possible due to the awesome company I work for: Rally Software in Boulder, CO. We get at least 1 hack week per quarter and it enables us to hack on awesome things like Docker Swarm. If you would like to cut to the chase and directly start playing with a Vagrant example, here is the repo that is the output of my Q1 2014 hack week efforts:

  1. https://github.com/docker/swarm 

  2. http://blog.docker.com/2015/01/dockercon-eu-introducing-docker-swarm/ 

  3. http://www.meetup.com/Docker-meetups/events/148163592/ 

  4. http://blog.docker.com/2014/12/announcing-docker-machine-swarm-and-compose-for-orchestrating-distributed-apps/ 

  5. https://github.com/docker/swarm/issues 

  6. https://github.com/ansible/ansible/issues/10032