Hi everyone!
As you may have noticed, there has not been much movement here on CICD 4 Life. I’ve been working on various other projects,
including a venture into building and touring large scale art. While I am still working in DevOps (at Workday), my general
direction involves moving towards art and sculpture.
However, until we get there I intend to keep updating here and queue up a few new posts on Kubernetes, GKE, and Jenkins.
Within a continuous integration / continuous delivery system one of the hardest
problems to deal with as the system and teams grow is build time dependency management.
At first, one version of a few dependencies is totally manageable in traditional ways.
yum install or apk add is the perfect solution for a single team or project.
Over time as the CI system begins to grow and support more and more teams this solution
starts to show weaknesses. Anyone who has had to install rvm, nvm, or any of the
other environment based tool version managers within a CI system knows the pain of
getting things working right in a stable way. In addition, distributing the configuration
for these tools can be just as challenging, especially when dealing with multiple
versions of a tool.
One way to help address these complications (in addition to a few others) is to
contain your tooling in Docker containers. This gives a few advantages over traditional
package managers:
The software is entirely contained within Docker and can be installed or removed
without fuss by any job that needs it
Containers can (and should) be built in house as to be reproducibly built at a minimum
and fully audited and tracked within the change management tool if required
Multiple versions and configurations can exist side by side without any interference
Containers can be shared between teams and shell wrappers distributed via Homebrew
How can we run yarn in a container for a local project?
TL;DR: Docker volumes
The way the process works is similar to other Docker workflows:
We build a Docker image that has whatever tool we need
Then any configuration (no secrets!) are layered in to the image
When run the container, we mount our current working directory into the container
The command is executed in the running container, but acting on the local directory
that is volume mounted
The command finishes and all output is captured in our local directory
The container exits and since we’ve used --rm, is completely gone
This gives us the effects of the tool without modifying other parts of the filesystem
as one does in normal software installation. One issue that this process has as stated
is that the command to run the container can be a bit unwieldy. In order to simplify
things in this regard we must sacrifice the ‘no changes to the filesystem’ benefit by
shipping a shell wrapper. Nonetheless, shipping a shell script or allowing others to
create their own is a bit easier than full package / config management.
Anyways, now that we have an idea of how it will work, let’s take a look at how it does
work.
Step 1: Build a Docker image for yarn
The first item we need is a Docker image that contains our tooling. In this case
we’re going to install yarn, a common dependency manager for Node, similar to npm.
Since Yarn depends upon Node, we can create a container that has the specific
version of each that is needed by the team using it. In this case we will install
the latest Node and Yarn packages, but pinning them to other versions would be a
fairly simple task.
Let’s take a look at our Dockerfile here:
# We're using alpine for simplicity. We could make it smaller# by downloading the tarball and adding to scratch with a multi-stage# Docker build
FROM alpine
# Install yarn which should pull in node as a dependency
RUN apk add --update yarn
# We will configure the cache to use our volume mounted workspace
RUN yarn config set cache-folder /workspace/.yarn-cache
# Using an entrypoint allows us to pass in any args we need
ENTRYPOINT ["yarn"]
This super simple Dockerfile will give us a container that has yarn
as an entrypoint. We can now build the image using a command like so:
docker build -t technolog/run-yarn .
This will give us the container named technolog/run-yarn that we can test
with a command like this:
docker run --rm-ti technolog/run-yarn --version# 1.3.2
Excellent, yarn works! However, in this configuration we have no way
to have it operate on a local package.json or node_modules. Everything
is still in the container. We will fix that by using a Docker volume mount.
Step 2: Volume mount the current directory into the Docker container
If we were to just run the container with the example above, nothing
is going to happen outside of the container. What we need to do is make
the current directory accessible inside the container with a Docker
volume. This is a simple task and looks something like:
docker run --rm-ti-v"$(pwd):/workspace" technolog/run-yarn init
# yarn init v1.3.2# question name: left-left-pad# question version (1.0.0): 10.0.0# question description: A left pad for the left pad# question entry point (index.js):# question repository url: https://github.com/technolo-g/left-left-pad# question author: Not me!# question license (MIT):# question private: no# success Saved package.json# Done in 76.15s.cat ./package.json
# {# "name": "left-left-pad",# "version": "10.0.0",# "description": "A left pad for the left pad",# "main": "index.js",# "repository": "https://github.com/technolo-g/left-left-pad",# "author": "Not me!",# "license": "MIT"# }
Here we can see that the file was created locally (./) and contains all of
the info we provided to yarn running in the Docker container. Pretty neat! One
thing you may notice is that the Docker command is growing a bit. This exact
command (or the one you create) doesn’t roll off of the fingers and so can be
hard to have everyone typing the same thing. There are a few solutions to this
minor issue and one of them is using bash aliases like so:
alias yarny="docker run --rm -ti -v \"\$(pwd):/workspace\" technolog/run-yarn"
which yarny
# yarny: aliased to docker run --rm -ti -v "$(pwd):/workspace" technolog/run-yarn
yarny --version# 1.3.2
If we are using this command in a lot of places and especially within the build
system, a slightly more robust wrapper may be required. Sometimes dealing with
the shell and it’s intricacies is best left to ZSH developers and a script is
a more unambiguous approach. What I mean by that is a script that encapsulates the
Docker command and is then installed on the user or machine’s path. Let’s take
a look at one for yarn:
#!/bin/bash -el# -e Makes sure we exit on failures# -l Gives us a login shell# Define a function that replaces our command
yarn(){# docker run# Remove the container when it exits# Mount ./ into the container at /workspace# Allow interactive shell# Provision a TTY# Specify the container and pass any args
docker run \--rm\--volume"$(pwd):/workspace"\--interactive\--tty\
technolog/run-yarn $@}# Run the function, passing in all args
yarn "$@"
Now if we make this file executable and run it, we should have a fully working
yarn installation within a container:
chmod +x yarn
./yarn --version# 1.3.2
Step 3: Distribute the software
The final step is getting these commands to be available. The beauty of this
solution is that there are many ways to distribute this command. The script can
live in a variety of places, depending on your needs:
In the code repo itself for a smaller team
Included and added to the path of the build runner
Distributed locally with Homebrew
Kept in a separate repo that is added to the path of builds
It depends on your environment, but I prefer to make the scripts available
by keeping them all in one repo, cloning that repo, and adding it to the
path on a build. This allows the scripts to change with the build and
versions to be pinned via git tags if needed. Every team can include
the scripts they need and use the version that works for them if they
have to pin.
Step 4: ….
Run the build with whatever tools are required
Step 5: Cleanup
Now that we’re done with the tools, let’s wipe them out completely. We will
do that using Docker’s prune command:
docker rm-fv$(docker ps -qa)||echo"INFO: No containers to remove"
docker system prune --all--force--volumes
This will kill any running containers and then prune (delete):
Any stopped containers
Any unused networks
Any unused images
Any build cache
Any dangling images
Pretty much anything we would worry about interfering with the next build.
If there are containers (such as the drone itself) that must be kept alive,
the command is a bit different, but more or less the same.
Enhancements
build.sh
Building the Docker image repeatably and consistently is key to this whole
approach. Changing how the container works depending on who builds it will
lead to the same pitfalls of bad dependency management: mainly broken builds.
Here is an example build.sh that I would use for the above container:
#!/bin/bash -el# If PUSH is set to true, push the imagepush="$PUSH"# Set our image name here for consistencyimage="technolog/run-yarn"# Run the build, adding any passed in params like --no-cache
docker build "$@"-t"$image"$(dirname--"$0")if["$push"=="true"];then
docker push "$image"fi
Versioning
Once teams begin using this framework, you’ll find each develops a set
of version requirements that may not match all the rest of the teams. When
you find yourself in this scenario, it is time to begin versioning the images
as well. While :latest should probably always point at the newest version,
it’s also reasonable to create :vX.X tags as well so teams can pin to
specific versions if desired.
In order to do this, you can add a Docker build argument or environment
variable to install a specific version of a piece of software and use
that version to tag the image as well. I am going to leave this as an exercise
for the user, but the steps would be:
In the Dockerfile, read that ARG and install a specific version of the software
This becomes a bit more complex when sharing between teams and requiring different
versions of both node and yarn, but it can be managed with a smart versioning scheme.
Disclaimer!
This methodology does not encourage just pulling random images from Docker hub and running
them! You must always use your good judgement when deciding what software to run
in your environment. As you see here, we have used the trusted Alpine Docker image and
then installed yarn from trusted Alpine packages ourselves. We did not rely on a random
Docker image found on the hub, nor did we install extra software that was not required or
executed untrusted commands (curl | sudo bash). This means as long as we trust Alpine,
we should be able to trust this image, within reason. As my Mum would say:
Downloading unknown or unsigned binaries from the Internet will kill you!
Conclusion
This is a powerful and flexible technique for managing build time dependencies within
your continuous integration / continuous delivery system. It is a bit overkill if you
have a single dependency and can change it without affecting anything unintended. However,
if you, like me, run many versions of software to support many teams’ builds, I think
you’ll find this to be a pretty simple and potentially elegant solution.
NOTE: If you intend on using techniques such as these and allowing such wide
open functionality in Jenkins, I recommend that you run your entire Jenkins
build system without outbound internet access by default. Allow access from the
build system network segment only to approved endpoints while dropping the rest
of the traffic. This will allow you to use potentially dangerous, but extremely
powerful scripts while maintaining a high level of security in the system.
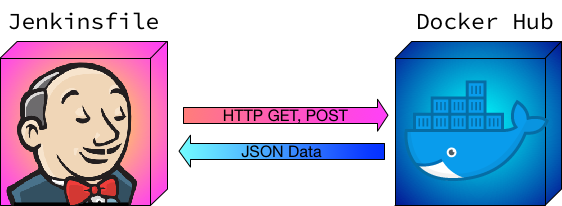
API Calls
Making HTTP calls in a Jenkinsfile can prove tricky as everything has to remain
serializable else Jenkins cannot keep track of the state when needing to restart
a pipeline. If you’ve ever received Jenkins’ java.io.NotSerializableException
error in your console out, you know what I mean. There are not too many clear-cut
examples of remote API calls from a Jenkinsfile so I’ve created an example
Jenkinsfile that will talk to the Docker Hub API using GET and POST to
perform authenticated API calls.
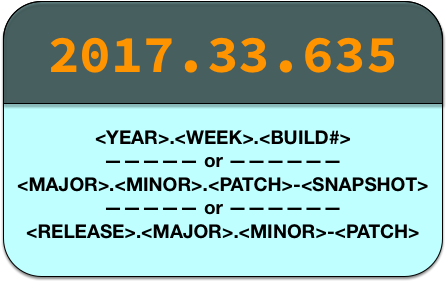
Explicit Versioning
The Docker image build process leaves a good amount to be desired when it comes
to versioning. Most workflows depend on the :latest tag which is very
ambiguous and can lead to problems being swallowed within your build system. In
order to maintain a higher level of determinism and auditability, you may
consider creating your own versioning scheme for Docker images.
For instance, a version of 2017.2.1929 #<year>-<week>-<build #> can express
much more information than a simple latest. Having this information available
for audits or tracking down when a failure was introduced can be invaluable, but
there is no built-in way to do Docker versioning in Jenkins. One must rely
on an external system (such as Docker Hub or their internal registry) to keep
track of versions and use this system of record when promoting builds.
This versioning scheme we are using is not based on Semver1, but it does
encode within it the information we need to keep versions in lock and also
will always increase in value. Even if the build number is reset, the date +
week will keep the versions from ever being lower that the day previously.
Version your artifacts however works for your release, but please make sure of
these two things:
The version string never duplicates
The version number never decreases
Interacting with the Docker Hub API in a Jenkinsfile
For this example we are going to connect to the Docker Hub REST API in order to
retrieve some tags and promote a build to RC. This type of workflow would be
implemented in a release job in which a previously built Docker image is being
promoted to a release candidate. The steps we take in the Jenkinsfile are:
Provision a node
Stage 1
Make an HTTP POST request to the Docker Hub to get an auth token
Use the token to fetch the list of tags on an image
Filter through those tags to find a tag for the given build #
Stage 2
Promote (pull, tag, and push) the tag found previously as ${version}-rc
Push that tag to latest to make it generally available
This is a fairly complex looking Jenkinsfile as it stands, but these functions
can be pulled out into a shared library2 to simplify the Jenkinsfile. We’ll
talk about that in another post.
Jenkinsfile
#!groovy/*
NOTE: This Jenkinsfile has the following pre-requisites:
- SECRET (id: docker-hub-user-pass): Username / Password secret containing your
Docker Hub username and password.
- ENVIRONMENT: Docker commands should work meaning DOCKER_HOST is set or there
is access to the socket.
*/importgroovy.json.JsonSlurperClassic;// Required for parseJSON()// These vars would most likely be set as parametersimageName="technolog/serviceone"build="103"// Begin our Scripted Pipeline definition by provisioning a nodenode(){// First stage sets up version infostage('Get Docker Tag from Build Number'){// Expose our user/pass credential as varswithCredentials([usernamePassword(credentialsId:'docker-hub-user-pass',passwordVariable:'pass',usernameVariable:'user')]){// Generate our auth tokentoken=getAuthTokenDockerHub(user,pass)}// Use our auth token to get the tagtag=getTagFromDockerHub(imageName,build,token)}// Example second stage tags version as -release and pushes to lateststage('Promote build to RC'){// Enclose in try/catch for cleanuptry{// Define our versionsdefversionImg="${imageName}:${tag}"deflatestImg="${imageName}:latest"// Login with our Docker credentialswithCredentials([usernamePassword(credentialsId:'docker-hub-user-pass',passwordVariable:'pass',usernameVariable:'user')]){sh"docker login -u${user} -p${pass}"}// Pull, tag, + push the RCsh"docker pull ${versionImg}"sh"docker tag ${versionImg} ${versionImg}-rc"sh"docker push ${versionImg}-rc"// Push the RC to latest as wellsh"docker tag ${versionImg} ${latestImg}"sh"docker push ${latestImg}"}catch(err){// Display errors and set status to failureecho"FAILURE: Caught error: ${err}"currentBuild.result="FAILURE"}finally{// Finally perform cleanupsh'docker system prune -af'}}}// NOTE: Everything below here could be put into a shared library// GET Example// Get a tag from Docker Hub for a given build numberdefgetTagFromDockerHub(imgName,build,authToken){// Generate our URL. Auth is required for private reposdefurl=newURL("https://hub.docker.com/v2/repositories/${imgName}/tags")defparsedJSON=parseJSON(url.getText(requestProperties:["Authorization":"JWT ${authToken}"]))// We want to find the tag associated with a build// EX: 2017.2.103 or 2016.33.23945defregexp="^\\d{4}.\\d{1,2}.${build}\$"// Iterate over the tags and return the one we wantfor(resultinparsedJSON.results){if(result.name.findAll(regexp)){returnresult.name}}}// POST Example// Get an Authentication token from Docker HubdefgetAuthTokenDockerHub(user,pass){// Define our URL and make the connectiondefurl=newURL("https://hub.docker.com/v2/users/login/")defconn=url.openConnection()// Set the connection verb and headersconn.setRequestMethod("POST")conn.setRequestProperty("Content-Type","application/json")// Required to send the request body of our POSTconn.doOutput=true// Create our JSON Authentication stringdefauthString="{\"username\": \"${user}\", \"password\": \"${pass}\"}"// Send our requestdefwriter=newOutputStreamWriter(conn.outputStream)writer.write(authString)writer.flush()writer.close()conn.connect()// Parse and return the tokendefresult=parseJSON(conn.content.text)returnresult.token}// Contain our JsonSlurper in a function to maintain CPSdefparseJSON(json){returnnewgroovy.json.JsonSlurperClassic().parseText(json)}
Script Security
Due to the nature of this type of script, there is definitely a lot of trust
assumed when allowing something like this to run. If you follow the process we
are doing in Modern Jenkins
nothing is getting into the build system without peer review and nobody but
administrators have access to run scripts like this. With the environment locked
down, it can be safe to use something of this nature.
Jenkins has two ways in which Jenkinsfiles (and Groovy in general) can be run:
sandboxed or un-sandboxed. After reading Do not disable the Groovy Sandbox
by rtyler (@agentdero on Twitter),
I will never disable sandbox again. What we are going to do instead is
whitelist all of the required signatures automatically with Groovy. The script
we are going to use is adapted from my friend Brandon Fryslie
and will basically pre-authorize all of the required methods that the pipeline
will use to make the API calls.
Pre-authorizing Jenkins Signatures with Groovy
URL: http://localhost:8080/script
importorg.jenkinsci.plugins.scriptsecurity.scripts.ScriptApprovalprintln("INFO: Whitelisting requirements for Jenkinsfile API Calls")// Create a list of the required signaturesdefrequiredSigs=['method groovy.json.JsonSlurperClassic parseText java.lang.String','method java.io.Flushable flush','method java.io.Writer write java.lang.String','method java.lang.AutoCloseable close','method java.net.HttpURLConnection setRequestMethod java.lang.String','method java.net.URL openConnection','method java.net.URLConnection connect','method java.net.URLConnection getContent','method java.net.URLConnection getOutputStream','method java.net.URLConnection setDoOutput boolean','method java.net.URLConnection setRequestProperty java.lang.String java.lang.String','new groovy.json.JsonSlurperClassic','new java.io.OutputStreamWriter java.io.OutputStream','staticMethod org.codehaus.groovy.runtime.DefaultGroovyMethods findAll java.lang.String java.lang.String','staticMethod org.codehaus.groovy.runtime.DefaultGroovyMethods getText java.io.InputStream','staticMethod org.codehaus.groovy.runtime.DefaultGroovyMethods getText java.net.URL java.util.Map',// Signatures already approved which may have introduced a security vulnerability (recommend clearing):'method java.net.URL openConnection',]// Get a handle on our approval objectapprover=ScriptApproval.get()// Aprove each of themrequiredSigs.each{approver.approveSignature(it)}println("INFO: Jenkinsfile API calls signatures approved")
After running this script, you can browse to
Manage Jenkins -> In-process Script Approval
and see that there is a list of pre-whitelisted signatures that will allow our
Jenkinsfile to make the necessary calls to interact with the Docker Hub API.
You’ll notice there is one method in there that they mark in red as you can see
the potential security issues with it. java.net.URL openConnection can be an
extremely dangerous method to allow in an unrestricted environment so be careful
and make sure you have things locked down in other ways.

 Image of Moonrock Mountain by Matt Bajor