Modern Jenkins Unit 1 / Part 2: Architecting a Jenkins + Docker CI System

Defining the architecture requirements

We have defined the characteristics of our system so we know how we want it to behave. In order to obtain that behavior though, we need to determine what architectural features will get us there. Let’s go through our business requirements one by one and come up with some technical requirements to guide us through the project.
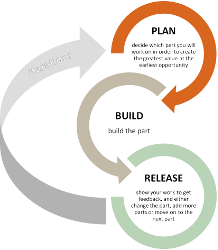
Easy to develop

We need a way to make changes to the system in order to move it forward that is easy to work with and as simple as possible. Developing in production may seem easy at first, but over time this creates a lack of trust in the system as well as a lot of downtime. Instead, let’s implement these technical features to make changing this system sustainable:

  1. New developers can get going by cloning the repo and running a command
  2. Everything can be run locally for development purposes
  3. Resetting to a known good state is quick and easy

Getting started workflow


PWD: ~/code

# Ok, let's get you setup FNG
git clone git@github.com:technolo-g/modern-jenkins.git

cd modern-jenkins/deploy/master/
./start.sh

# You should be all set! You can begin development now.

Safe to develop

The nature of a CI system is to verify code exhibits the qualities we want and expect it to then deliver it production. This makes it inherently dangerous as it is extremely powerful and programmed to deliver software to production. We need the ability to modify this system without interfering with production by accident. To accomplish this we will implement:

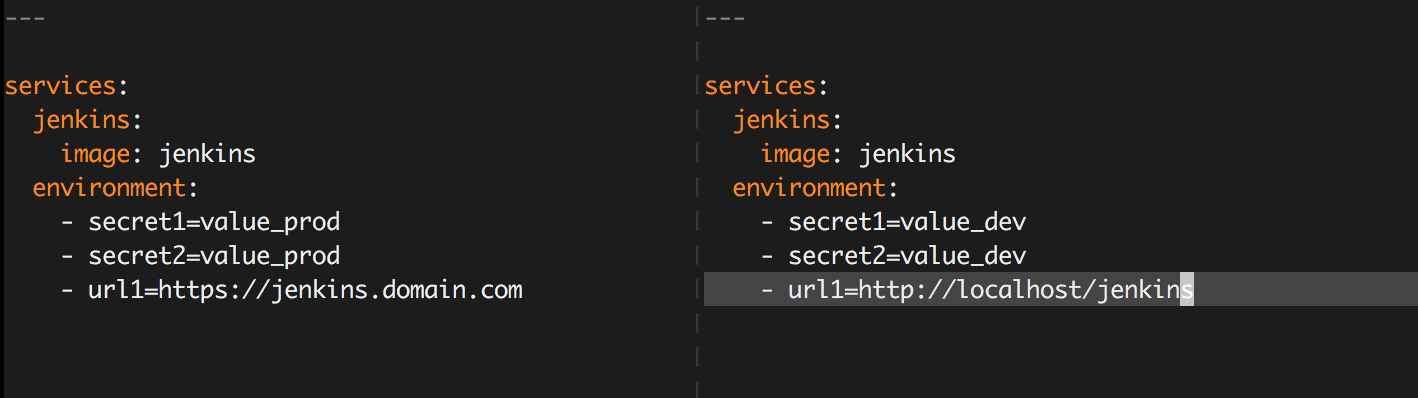
  1. Splitting development and production credentials
  2. Disabling potentially dangerous actions in development
  3. Explicitly working with forks when possible

Dev vs. Prod

Consistently deployable

This system, when deployed to production, will be used by a large portion of your development team. What this means is that downtime in the build system == highly paid engineers playing chair hockey. We want our system to always be deployable in case there is an issue with the running instance and also to be able to quickly roll back if there is an issue with a new version or the like. To make this happen we will need:

Compiling

  1. A versioning system that keeps track of the last known good deployment
  2. State persistence across deploys
  3. A roll-forward process
  4. A roll-back process

Easy to upgrade

The nature of software development involves large amounts of rapid change. Within our system this mostly consists of plugin updates, Jenkins war updates, and system level package updates. The smaller the change during an upgrade, the easier it is to pinpoint and fix any problems that occur and the way to do that is frequent upgrades. To make this a no-brainer we will:

  1. Build a new image on every change, pulling in new updates each time
  2. Automatically resolve plugin dependencies
  3. Smoke test upgrades before deployment

Dev vs. Prod

Programmatically configurable

Hand configuring complex systems never leads to the same system twice. There are lots of intricacies of the config including: order of operations, getting the proper values, dealing with secrets, and wiring up many independent systems. Keeping track of all this in a spreadsheet that we then manually enter into the running instance will get it done, but becomes pure nightmare mode after the first person is done working on it. Luckily with Jenkins’ built in Groovy init system 1, we will be able to configure Jenkins with code in a much more deterministic way. Most of this functionality is built in, but we will still need:

I heard you like CI/CD

  1. A process to develop, test, and deploy our Groovy configuration
  2. A mechanism to deploy it along with the master
  3. The ability to share these scripts across environments

Immutable

With a consistently deployable, programmatically configured system it is almost as easy to redeploy instead of modifying the running instance. It is indeed easier to just click a checkbox in the GUI to change a setting the first time you do it, but the second, third, and fourth times become increasingly more difficult to remember to go check that box. For this reason, we are NEVER* going to mutate our running instance. We will instead just deploy a new version of our instance. This will only be a process change as the architectural features listed above will enable this process. We should however, document this process so that it will be followed by all.

  1. Documentation of how to get changes into production
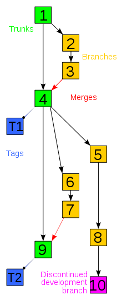
100% in SCM

Everything we’re doing is ‘as code’ so we will store it in the source repository ‘as code’. This will include master configuration, secrets, job configuration, infrastructure provisioning and configuration, as well as anything else the system needs to operate. To support this we’ll need:

  1. A SCM repo (we’re using a Git repo hosted by GitHub)
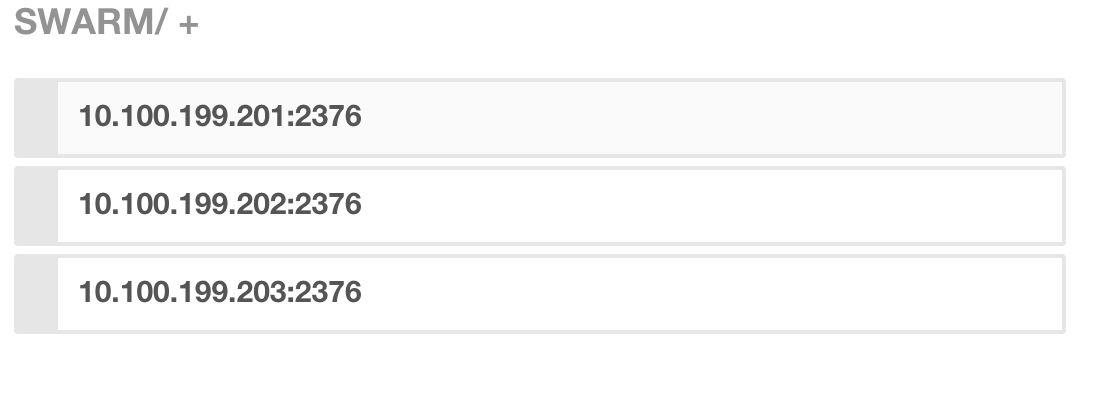
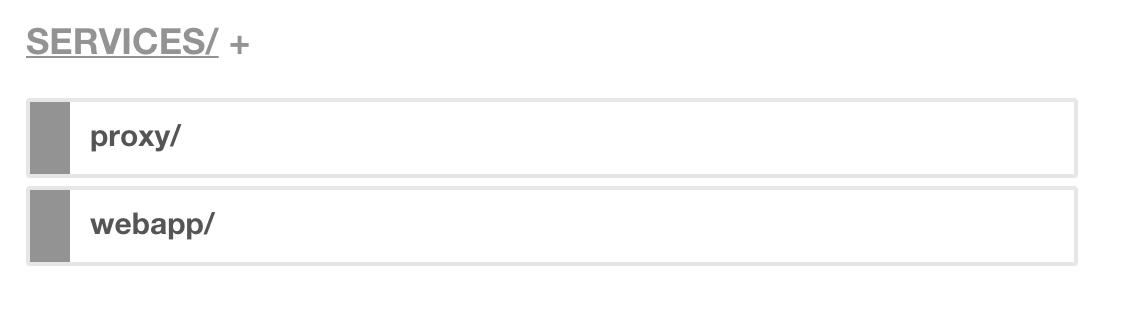
  2. A layout that supports: - Docker containers - Deployment tooling - Job DSL - Secrets
  3. A mechanism for encrypting secrets in the repo

Git Repo Diagram

.
├── README.md
├── ansible
│   ├── playbook.yml
│   └── roles
├── deploy
│   ├── master
│   │   └── docker-compose.yml
│   └── slaves
├── images
│   ├── image1
│   │   └── Dockerfile
│   └── image2
│       └── Dockerfile
└── secure
    ├── secret1
        └── secret2

Secure

This pipeline can be considered the production line at a factory. It is where the individual components of your application are built, tested, assembled, packaged, and deployed to your customers. Any system that does the above mentioned processes should be heavily locked down as it is integral to the functioning of the company. Specifically we should:

Datacenter Cages

  1. Keep secrets secure and unexposed
  2. Segregate actions by user (both machine and local)
  3. Create an audit trail for any changes to the production system
  4. Implement least-privilege access where necessary
  5. Apply patches as soon as is feasible

Scalable

If scalability is thought of from day 0 on a project it is much easier to implement than if it is bolted on later. These systems have a tend to grow over time and this growth should be able to happen freely. This is not always an easy task, but we will attempt to make it easier by:

  1. Keeping individual components de-coupled for independent scaling
  2. Not locking ourselves into a single platform or provider
  3. Monitoring the system to point out bottlenecks

Scaling to infinity… and beyond! Scaling to infinity

Now let’s start making some stuff!

Next Post: Code Repository and Development Lifecycle for a Jenkins + Docker CI/CD System

Modern Jenkins Unit 1 / Part 1: Planning a Jenkins + Docker CI System

What are we doing here?

I have been introduced to far more installations of Jenkins that suck than don’t. One of the issues with a system of this level of complexity that is shared between many teams is that they tend to grow organically over time. Without much “oversight” by a person or team with a holistic view of the system and a plan for growth, these build systems can turn into spaghetti infrastructure the same way a legacy codebase can turn into spaghetti code.

Devil Jenkins!

Eventually failures end up evenly dividing themselves amongst infrastructure, bad commits, and flaky tests. Once this happens and trust is eroded, the only plausible fix for most consumers is to re-run the build. This lack of trust really makes it less fun to develop quality, reliable software. Its very important to have trust that the systems you are using to verify your work and not the other way around. An error in a build should unambiguously point to the code, not the system itself.

While not all companies can afford to have a designated CI team supporting the build infrastructure, it is possible to design the system initially (or refactor) in a way that encourages good practice and stability thus elevating developers’ confidence in the system and speed with which they can deliver new features. This series of posts will hopefully be able to get you started in the right direction when having to build or refactor a CI / CD system using Jenkins.

Describing the characteristics of the end state

I am a big fan of Agile software development1 myself. I don’t believe that there is one kind of ‘Agile’ that works for everyone or anything like that, but I do believe 100% in the iterative approach agile takes to solve complex problems. Breaking work into small deliverables, and using those chunks for planning at multiple intervals such as:

  • Yearly: Very high level direction
  • Quarterly: General feature requirements
  • Sprint: Feature implementation details

Agile Lifecycle

When you have multiple perspectives on the scope and movement of a project, it really gives you the ability to manage expectations and make the most of your time. Since you have a general idea of what the long term goals are, you (ideally) can then make trade-off decisions with accurate values on the scales. This leads to less rewrites and the ability to put a bit more into the code you write because you know it will become legacy and you know Future You will appreciate the effort.

This is perhaps in opposition to the idea of hacking your way to a solution which is also valuable process, but more for a problem with an undefined domain. Luckily shipping software has most of problem domain defined so we’re able to set long, medium, and short time goals for our CI / CD infrastructure.

Anyways, let’s state some of the properties we want from our build system:

Super happy developer guy

  • Easy to develop: A common problem with complex systems is that the process of setting up a local development environment is just as complex, if not more so. We will be developing just about the entire system locally on our laptop so we should hopefully get this for minimal cost.

  • Safe to develop: Another property that goes hand in hand with easy to develop is safe to develop. If our local environment is always reaching out to prod to comment on PRs or perhaps pushing branches and sending Slack notifications, it can be misleading and confusing to figure out where exactly these things are coming from. We will attempt to null out any non-local side effects in our development environment to provide a safe place to work.

  • Consistently deployable: Hitting the button and getting an error during a deployment is one of the worst feelings ever. In most cases when we need to deploy, we need to deploy right now! While building this project we will always keep master releasable and work with our automation in a way that no matter when we need to deploy, it will go.

    Roll safe my friend

  • Easy to upgrade: The best way to mitigate dangerous upgrades is to do them more frequently. While this may sound counterintuitive, it works for a couple of reasons:
    1. The delta is smaller the more frequently you upgrade (and deploy!)
    2. Each time you upgrade and deploy, you get more practice at it
    3. If you fix a small error each upgrade, eventually most errors are fixed :) As we will see, what enables easy upgrades is a rollback safety net and a good way to verify the changes are safe. Since we’ll never be able to catch all the bugs, having the rollback as a backup tool is clutch.

    It's Groovy baby, groovy yeah!

  • Programmatically configurable: This is a giant one. Humans are really terrible at doing or creating the same thing over and over. This is way worse once you have a group of humans trying to do the same thing over and over (like creating jobs or configuring the master). Since we cannot be trusted to click the right buttons in the right sequence, we need to make sure the system does not depend on us doing that. We will cover a variety of tools to configure our system including the Netflix Job DSL, Groovy configuration via the Jenkins Init system, and later on Jenkinsfiles. There should be nothing that is hand jammed!

    Revision Control like a boss

  • Immutable: “Immutable Infrastructure” 2 is a term that was coined by Chad Fowler back in 2013. He proposes that the benefits of immutability in software architecture (like what is brought by functional programming) would also apply to infrastructure. What this translates to is that instead of mutating a running server by applying updates, rebooting, and changing configuration on running machines, when changes need to be made we should just redeploy a new set of servers with the updated code instead. This makes it much easier to reason about what state a system is in. You will see that this is one of the main characteristics that makes this Jenkins infrastructure different (and I think much better) than a legacy installation.

  • 100% in SCM: Since we are committing to programmatic configuration, it is crucial that we keep everything within source control management. We should apply the same rigor with our CI / CD system’s codebase that we do with the one it is testing. PRs and automated tests should be the norm with anything you are creating, even if it is a one man show (IMHO).

    Secure

  • Secure: Security is constantly an afterthought which is a dangerous way to work in a build system. These systems are so complex and so critical to the company (they actually assemble and package the product) that we MUST make them secure by default. Sane secrets management, least access privileges, immutable systems, and forcing an audit trail all lead to a more secure and healthy environment.

    Scalable

  • Scalable: Build systems at successful companies only grow, they do not shrink. Teams are constantly adding more code, more tests, more jobs, and more artifacts. Normally this occurs in a polyglot environment leading to exponential growth of requirements on the machines that are actually doing the builds. It does not scale to have a single server with every single requirement installed. This pattern soon becomes unwieldly and hard to work with. We should containerize everything and separate the infrastructure from the system running on top of it to allow independent and customized scaling and maintenance.

If we can build a system that meets these requirements, we will get a lot of stuff for free as well including:

PROFIT

  • Easy disaster recovery
  • Portability to different service providers
  • Fun working environment
  • High levels of productivity
  • Profit!

An iterative approach

Each iteration will build a shippable increment on top of the iteration before it and eventually we will have a production Jenkins! Along the way we will learn a bunch of stuff, build some Docker containers, write a compose file, automate some configuration, get real groovy, and much, much more. I encourage you to stay tuned and work through solving this problem with me.

All code will be published to this blog’s git repo 3 so that you can verify your answers and fix inconsistencies if you get stuck along the way. The repo should be tagged to match up with this series.

Now that we have a general idea of how we want our system to behave and how we will build it out, let’s dig into the architectural concerns.

Next Post: Architecting a Jenkins + Docker CI System

Intro to Docker Swarm: Part 4 - Demo

Vagrant up up and away!

The primary output of my hackweek endeavours was a Docker Swarm cluster in a Vagrant environment. This post will go over how to get it spun up and then how to interact with it.

What is it?

This is a fully functional Docker Swarm cluster contained within a Vagrant environment. The environment consists of 4 nodes:

  • dockerhost01
  • dockerhost02
  • dockerhost03
  • dockerswarm01

The Docker nodes (dockerhost01-3) are running the Docker daemon as well as a couple of supporting services. The main processes of interest on the Docker hosts are:

  • Docker daemon: Running with a set of tags
  • Registrator daemon: This daemon connects to Consul in order to register and de-register containers that have their ports exposed. The entries from this service can be seen under the /services path in Consul’s key/value store
  • Swarm client: The Swarm client is what maintains the list of Swarm nodes in Consul. This list is kept under /swarm and contains a list of <ip>:<ports> of the Swarm nodes participating in the cluster

The Docker Swarm node (dockerswarm01) is also running a few services. Since this is just an example a lot of services have been condensed into a single machine. for production, I would not recommend this exact layout.

  • Swarm daemon: Acting as master and listening on the network for Docker commands while proxying them to the Docker hosts
  • Consul: A single node Consul instance is running. It’s UI is available at http://dockerswarm01/ui/#/test/
  • Nginx: Proxying to Consul for the UI

How to provision the cluster

1. Setup pre-requirements

  • The GitHub Repo: https://github.com/technolo-g/docker-swarm-demo
  • Vagrant (latest): https://www.vagrantup.com/downloads.html
  • Vagrant hosts plugin: vagrant plugin install vagrant-hosts
  • VirtualBox: https://www.virtualbox.org/wiki/Downloads
  • Ansible: brew install ansible
  • Host entries: Add the following lines to /etc/hosts:
10.100.199.200 dockerswarm01
10.100.199.201 dockerhost01
10.100.199.202 dockerhost02
10.100.199.203 dockerhost03

2a. Clone && Vagrant up (No TLS)

This process may take a while and will download a few gigs of data. In this case we are not using any TLS. If you want to use TLS with Swarm, go to 2b.

# Clone our repo
git clone https://github.com/technolo-g/docker-swarm-demo.git
cd docker-swarm-demo

# Bring up the cluster with Vagrant
vagrant up

# Provision the host files on the vagrant hosts
vagrant provision --provision-with hosts

# Activate your enviornment
source bin/env

2b. Clone && Vagrant up (With TLS)

This will generate certificates and bring up the cluster with TLS enabled.

# Clone our repo
git clone https://github.com/technolo-g/docker-swarm-demo.git
cd docker-swarm-demo

# Generate Certs
./bin/gen_ssl.sh

# Enable TLS for the cluster
echo -e "use_tls: True\ndocker_port: 2376" > ansible/group_vars/all.yml

# Bring up the cluster with Vagrant
vagrant up

# Provision the host files on the vagrant hosts
vagrant provision --provision-with hosts

# Activate your TLS enabled enviornment
source bin/env_tls

3. Confirm it’s working

Now the cluster is provisioned and running, you should be able to confirm it. We’ll do that a few ways. First lets take a look with the Docker client:

$ docker version
Client version: 1.4.1
Client API version: 1.16
Go version (client): go1.4
Git commit (client): 5bc2ff8
OS/Arch (client): darwin/amd64
Server version: swarm/0.0.1
Server API version: 1.16
Go version (server): go1.2.1
Git commit (server): n/a

$ docker info
Containers: 0
Nodes: 3
 dockerhost02: 10.100.199.202:2376
 dockerhost01: 10.100.199.201:2376
 dockerhost03: 10.100.199.203:2376

Now browse to Consul at http://dockerswarm01/ui/#/test/kv/swarm/ and confirm that the Docker hosts are listed with their proper port like so:

Consul Swarm cluster

The cluster seems to be alive, so let’s provision a (fake) app to it!

How to use it

You can now interact with the Swarm cluster to provision nodes. The images in this demo have been pulled down during the Vagrant provision so these commands should work in order to spin up 2x external proxy containers and 3x internal webapp containers. Two things to note about the commands:

  • The constraints need to match tags that were assigned when Docker was started. This is how Swarm’s filter knows what Docker hosts are available for scheduling.
  • The SERVICE_NAME variable is set for Registrator. Since we are using a generic container (nginx) we are instead specifying the service name in this manner.
# Primary load balancer
docker run -d \
  -e constraint:zone==external \
  -e constraint:status==master \
  -e SERVICE_NAME=proxy \
  -p 80:80 \
  nginx:latest

# Secondary load balancer
docker run -d \
  -e constraint:zone==external \
  -e constraint:status==non-master \
  -e SERVICE_NAME=proxy \
  -p 80:80 \
  nginx:latest

# 3 Instances of the webapp
docker run -d \
  -e constraint:zone==internal \
  -e SERVICE_NAME=webapp \
  -p 80 \
  nginx:latest

docker run -d \
  -e constraint:zone==internal \
  -e SERVICE_NAME=webapp \
  -p 80 \
  nginx:latest

docker run -d \
  -e constraint:zone==internal \
  -e SERVICE_NAME=webapp \
  -p 80 \
  nginx:latest

Now if you do a docker ps or browse to Consul here:

http://dockerswarm01/ui/#/test/kv/services/

Consul Swarm services

You can see the two services registered! Since the routing and service discovery part is extra credit, this app will not actually work but I think you get the idea.

I hope you have enjoyed this series on Docker Swarm. What I have discovered is Docker Swarm is a very promising application developed by a very fast moving team of great developers. I believe that it will change the way we treat our Docker hosts and will simplify things greatly when running complex applications.

All of the research behind these blog posts was made possible due to the awesome company I work for: Rally Software in Boulder, CO. We get at least 1 hack week per quarter and it enables us to hack on awesome things like Docker Swarm. If you would like to cut to the chase and directly start playing with a Vagrant example, here is the repo that is the output of my Q1 2014 hack week efforts: