Note: I am assuming familiarity with Docker for this tutorial, but even if you’ve never used it I think it should still be possible to follow along. It always helps to know your tools though so if you’re unfamiliar take some time to do a Docker Hello World or the like. It will be worth your investment in time as we will be using this technology throughout the tutorial. Everything we will do is based on Docker for Mac which you can download here: https://www.docker.com/docker-mac Linux users should be able to follow along without much adjustment too.
Building our Images

Well I think we’re fully setup with a great foundation at this point. We have a general spec for the system we would like to create, we have a nicely organized code repository hosted in GitHub and setup with a Grade A PR template that will ensure we’re thinking about what we’re doing, and we have a workflow that works for us and is reusable in any situation (nobody hates receiving PRs). It is time to actually begin writing some code!
Nearly every software vendor provides a Docker image for their piece of software which is super awesome when spiking things out or researching a new technology. The reality of it is though that a lot of companies have a security requirement that all software is vetted by the security team and then consumed from internal repositories. These repositories are served up by tools such as Artifactory 1 and feature built-in security scanning via Black Duck 2, permission models that allow only certain users to publish, and promotion mechanisms for getting only verifiable software into the environment. Pulling Docker images straight off of the Hub does not fit into that model at all.
For that reason, we are going to develop a set of our own images with a common base. This gives us commonality between images which has many benefits including flexibility to add only the software that we want to. Now our examples will use public servers for all of this activity, but you can substitute those URLs for the URLs of your own internal artifact repository.
While we don’t want to trust every Docker image that has been published, we do have to start our chain of trust somewhere. In our case we will start with the CentOS 7 base image from the Docker Hub. There are lots of other great options out there, such as Alpine and Ubuntu, but I think CentOS is perfectly fine for this application and is what I use on a daily basis due to certain requirements.

modernjenkins/jenkins-base
![]()
This image contains purely the JDK. Since we decided to base this image on CentOS (for security, support, compatibility, and reliability to name a few reasons) that is where our chain of trust begins. I personally have been trusting CentOS DVDs for an extremely long time so I feel confident they are a good place to start. On top of the Centos 7 base we will install the OpenJDK and setup a few environment vars. Let’s show the whole file and then talk about what each of the sections are.
images/jenkins-base/Dockerfile
# images/jenkins-base/Dockerfile
FROM centos:7
MAINTAINER matt@notevenremotelydorky

LABEL dockerfile_location=https://github.com/technolo-g/modern-jenkins/tree/master/images/jenkins-base/Dockerfile \
      image_name=modernjenkins/jenkins-base \
      base_image=centos:7


# Jenkins' Environment
ENV JENKINS_HOME /var/jenkins_home
ENV JENKINS_ROOT /usr/share/jenkins
ENV JENKINS_WAR /usr/share/jenkins/ref/warfile/jenkins.war
ENV JENKINS_SLAVE_AGENT_PORT 50000
ENV user=jenkins
ENV group=jenkins
ENV uid=1000
ENV gid=1000

# Jenkins Version info
ENV JENKINS_VERSION 2.69
ENV JENKINS_SHA d1ad00f4677a053388113020cf860e05a72cef6ee64f63b830479c6ac5520056

# These URLs can be swapped out for internal repos if needed. Secrets required may vary :)
ENV JENKINS_UC https://updates.jenkins.io
ENV JENKINS_URL http://mirrors.jenkins.io/war/${JENKINS_VERSION}/jenkins.war

# Jenkins is run with user `jenkins`, uid = 1000
# If you bind mount a volume from the host or a data container,
# ensure you use the same uid
RUN groupadd -g ${gid} ${group} \
    && useradd -d "$JENKINS_HOME" -u ${uid} -g ${group} -s /bin/bash ${user}

# Install our tools and make them executable
COPY files/jenkins-support /usr/local/bin/jenkins-support
RUN mkdir -p ${JENKINS_ROOT}
RUN chown jenkins /usr/local/bin/* ${JENKINS_ROOT} \
    && chmod +x /usr/local/bin/*

# Configure to Denver timezone. I dislike debugging failures in UTC
RUN unlink /etc/localtime && ln -s /usr/share/zoneinfo/America/Denver /etc/localtime

# Install Java, Git, and Unzip
RUN yum install -y java-1.8.0-openjdk-devel tzdata-java git unzip \
    && yum clean all
The above Dockerfile will be our base image that everything else will inherit from. While we are initially only creating a single Jenkins master, you may find that others in your organization would like their own Jenkins instance and this pattern ensures you’re ready for it without sacrificing readability. Now let’s talk about what is in this Dockerfile.
Metadata
# images/jenkins-base/Dockerfile
FROM centos:7
MAINTAINER matt@notevenremotelydorky

LABEL dockerfile_location=https://github.com/technolo-g/modern-jenkins/tree/master/images/jenkins-base/Dockerfile \
      image_name=modernjenkins/jenkins-base \
      base_image=centos:7
This information is critical when tracking down a source in the supply chain as well as for new contributors who want to change how the container works.
#comment at the top is just the path within the repo to the file itselfFROMdefines the image that we are building on top ofMAINTAINERtells who the maintainer of this image isLABELsection provides labels that can be accessed withdocker inspect
Environment
# Jenkins' Environment
ENV JENKINS_HOME /var/jenkins_home
ENV JENKINS_ROOT /usr/share/jenkins
...
These environment variables values that we want to have permanently baked into the image. They will be available in any container that is instantiated from this image or any other that inherits it. These types of variables make it easy to bring consistency across the environment.
Files & Commands (Actually doing the work)
RUN groupadd -g ${gid} ${group} \
    && useradd -d "$JENKINS_HOME" -u ${uid} -g ${group} -s /bin/bash ${user}

# Install our tools and make them executable
COPY files/jenkins-support /usr/local/bin/jenkins-support
...
These steps actually modify our image by installing software, modifying the filesystem, adding files from the build context, etc. They can use the ENV vars set above or arguments passed in as well as all other kinds of manipulations. You can see all the possible commands here: https://docs.docker.com/engine/reference/builder/
Adding the jenkins-support file to the repo
We depend on a file called jenkins-support to make things work correctly. It is basically a shim to get Jenkins working within a Docker container properly. It cant be downloaded from my repo like so:
PWD: ~/code/modern-jenkins
cd images/jenkins-base
mkdir files
wget -O files/jenkins-support https://raw.githubusercontent.com/technolo-g/modern-jenkins/master/images/jenkins-base/files/jenkins-support
chmod +x files/jenkins-support
Notes about images
Each line in a Dockerfile creates a layer and then all of these layers are
mushed together (or was it squished?) to make our root fs. This mushing process
is only ever additive so what that means is if you create a big file in one
RUN step but then remove it in another RUN step, you’re not actually going
to see any difference in image size. The key is finding the right balance
between number of layers and size of layers. If we can keep layers under 50mb
but still split up our logical process into easily understood and intuitive
blocks (ie: doing a full yum transaction in one RUN block) then we’re sittin’
pretty.
From the Docker website
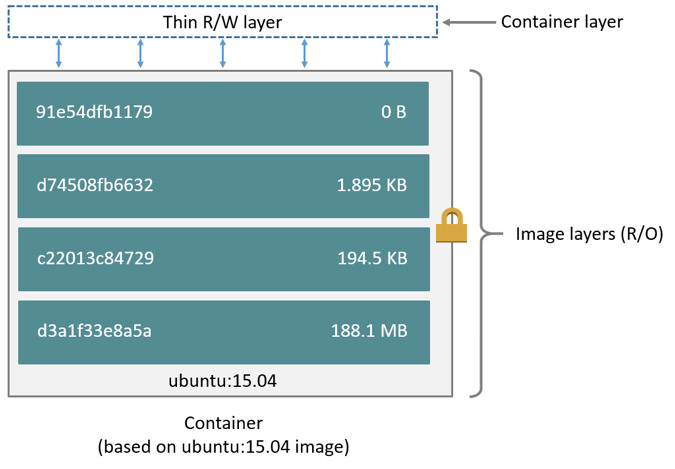
There is so much more I would like to tell you about best practices that I’ve found around image creation that I will have to save it for another post. Just know for now, we can never delete data that was created in a previous layer. That will directly translate into cleaning up after yourself in an atomic action. A real example is this:
# Install Java, Git, and Unzip then cleanup
RUN yum install -y java-1.8.0-openjdk-devel tzdata-java git unzip \
    && yum clean all
Building the image
Now that we have a super awesome Dockerfile, we need to build it. Normally I
would have you do docker image build -t blah/boring . etc., but today I’m going to
set your future self up for a win. We’re going to write a script right off
the bat to build this thing. I promise you that you will be rebuilding this
image at least 2 more times so let’s just go ahead and script it from the get go.
images/jenkins-base/build.sh
#!/bin/bash -el
# images/jenkins-base/build.sh

# Define our image name
image_name=modernjenkins/jenkins-base:latest

# Accept any args passed and add them to the command
docker image build ${@} -t $image_name $(dirname -- "$0")

# If we add PUSH=true to the command, it will push to the hub
if [ "$PUSH" = true ] ; then
  docker image push $image_name
fi
This will not be the last time we see this lil’ guy as we will add it to all of
the image repos. Some may say “That’s not DRY Matt!”, to which I say
“Suck a lemon!”. This code will never change and know that you can
cd images/blah && ./build.sh really makes it easy and convenient to work with
these images. Now we run the script and out pops a baby Docker :)
PWD: ~/code/modern-jenkins
cd images/jenkins-base
chmod +x ./build.sh # Gotta set executable perms
./build.sh
# ...
# profit!
yey! You’ve built your first Docker image (for this project)!
Testing the image
We can now go ahead and give this image a quick spin. It won’t be too exciting, but we can probably run the standard test to see that Java is installed:
PWD: ~/code/modern-jenkins
# Run the container and pop yourself into a shell
docker run --rm -ti modernjenkins/jenkins-base bash

# Check for java
java --version
# damn
java --help
# ugh
java version
# wtf! oh right...
java -version
openjdk version "1.8.0_141"
OpenJDK Runtime Environment (build 1.8.0_141-b16)
OpenJDK 64-Bit Server VM (build 25.141-b16, mixed mode)
Commit and push
OK, so now that we have a nice working image, this seems like a perfect place to
call shippable increment. Let’s commit to our branch, push it to origin, clean
up any erroneous commits by squashing.
, and create a PR. We will then self review it, confirm everything looks up to
snuff, and merge. Then a nice little git pull should get us all up to date
locally and we can begin work on the next increment.
PWD: ~/code/modern-jenkins/
git checkout -b feat-add_jenkins-base_image
git add .
git commit -m "Add a base image containing OpenJDK 8"
git push origin feat-add_jenkins-base_image
Moving on
Now we’ll begin to build on top of our base images. If you need to see the repo’s
state at the end of this section, please rever to the unit2-part2 tag here:
https://github.com/technolo-g/modern-jenkins/tree/unit2-part2