Configuring the Jenkins Master on Boot with Groovy
One of the greatest strengths of Jenkins is it’s ability to do almost anything.
This comes from it’s extremely customizable nature. I think of it as a scheduler
that can do any given task on any given trigger with enough configuration. What
we are building specifically though is a system to build, test, and deploy our
piece of custom software that most likely is at least a little bit different
than anything else out there requiring the same tasks. We will need to use
Jenkins’ ultra powerful customization toolkit, but do it in a way that strives
to be:
Deterministic: Given a set of inputs, there should be only one output.
If that output is not as we expect, there is a problem that we should spend
time fixing. ie: removing “flaky” tests that fail for “no reason”.
Reliable: The system should have high availability to the users who depend
on it. Having a system that is sometimes down and sometimes up does not
encourage teams to inject automated builds into their workflows.
Repeatable: This system should be able to be recreated without persistent
data from the repo.
Agile: The system should evolve to meet the needs of it’s consumers in a
sustainable way. If one team’s jobs or configs are breaking another team’s
pipelines, it is a good indication that it is time to split the monolith
into two independent systems.
Scalable: As the system becomes more popular, more people are going to
utilize it. When this happens, it’s critical to be able to support the
increased capacity in not only job runners, but also collaboration from
more teams.
Luckily we can treat the code that configures the system in the same way we
treat the code the builds and runs the system :)
Intro to the Jenkins init system
Jenkins has a not-much-talked about feature that I have yet to see much
information on. It is the Jenkins Groovy Init system and really the only
documentation I have been able to find are two articles on the Jenkins
wiki: https://wiki.jenkins.io/display/JENKINS/Post-initialization+script
  Post-initialization script

  Created by Kohsuke Kawaguchi, last modified by Daniel Beck on Dec 10, 2015

  You can create a Groovy script file $JENKINS_HOME/init.groovy, or any .groovy
  file in the directory $JENKINS_HOME/init.groovy.d/, (See Configuring Jenkins
  upon start up for more info) to run some additional things right after Jenkins
  starts up. This script can access classes in Jenkins and all the plugins. So for
  example, you can write something like:
  import jenkins.model.*;

  // start in the state that doesn't do any build.
  Jenkins.instance.doQuietDown();


  Output is logged to the Jenkins log file. For Debian based users, this is
  /var/log/jenkins/jenkins.log
  Jenkins can execute initialization scripts written in Groovy if they are present
  during start up. See Groovy Hook Script for details. The hook name for this
  event is "init". Those executions happen at the very end of the initialization,
  and therefore this can be used to pre-configure Jenkins for a particular OEM
  situation.

  While one can always write a plugin to participate in the initialization of
  Jenkins, this script-based approach can be useful as it doesn't require any
  compilation and packaging.
Not super impressive documentation considering how powerful this mechanism is.
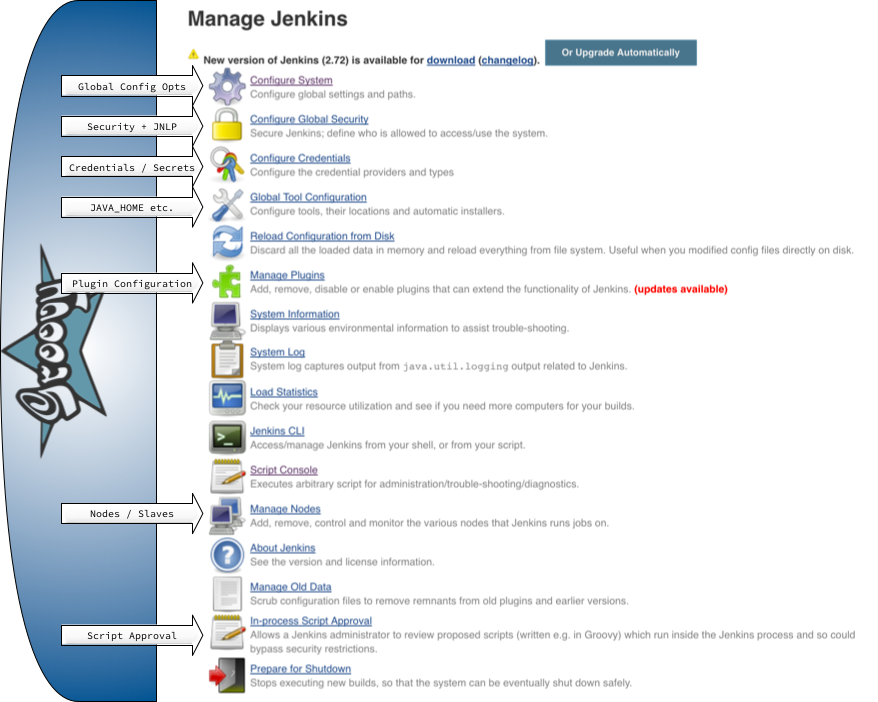
Using this init system you are able to configure any aspect of the master that
you are able to using “Manage Jenkins”. This includes (but is not limited to):
The URL and name of this instance
Authentication and security settings
Secrets in the credential store
Global plugin configuration
Global tool configuration
Adding and removing nodes
Creation of jobs (though we’ll only use it to create one special job)
The Groovy Script Console
Not only does it support configuring so much of the system, it has a direct
REPL like environment to code in. This is called the “Script Console” (available
at http://localhost:8080/script on our instance) and can be considered a shell
into the Jenkins system. This shell has the same abilities of the init system’s
shell so it makes for super quick and easy development of the scripts that we
will use.
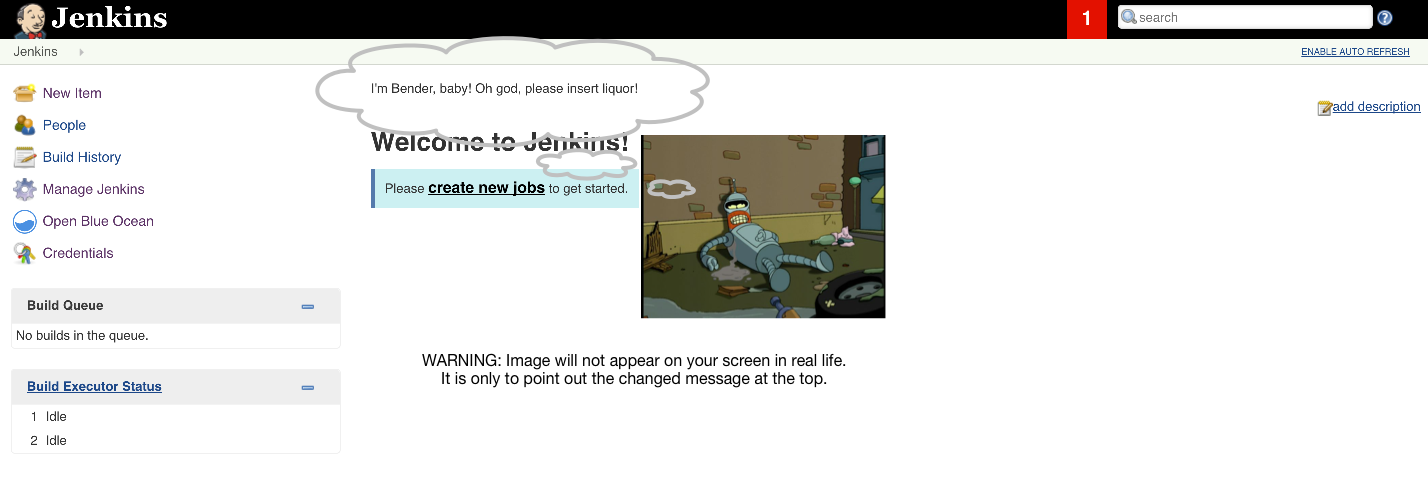
Jenkins Groovy Hello World
Let’s kill two stones with one bird. We will do a quick little Hello World that
will introduce you to bot the syntax of groovy as well as how to use the script
console.
Stand up your development Jenkins (cd deploy/master && docker-compose up -d)
importjenkins.model.*defjenkins=Jenkins.getInstance()jenkins.setSystemMessage("I'm Bender, baby! Oh god, please insert liquor!")// You can change the message if you please. I'm not at the office :)
Browse back to the main Jenkins interface
Check out the cool message for all the users of your system to see. I bet your
boss will love it!
Nothing too crazy, but this should give you a good idea of how we are going to
configure our master to build our particular brand of software. Inside Old Mr.
Jenkins is just a series of objects (I think of them as his organs) that we can
grab and squeeze and modify to fit our needs. I hope Janky is ready to play
“Operation”!
Back in aught eight when I was a kid, the way we deployed complex services was a
1000 line shell script that was neither idempotent nor checked into SCM. It just
sat there at an http endpoint, ready for sudo | bashing (I guess normally sudo
wasn’t an issue as we ran as root :P). If it needed a tweak, you could just ssh
to the server, fire up pico, make the change, deploy your stuff, sit back and
relax while wondering why the rest of the team is complaining about deploys not
working. After all, it Works on My Machine :)
While I look back with fondness at the days of yore, I can only imagine it is the
fresh Colorado air that is making me forget how crappy it is to have one deploy
work and then literally the same thing 5 minutes later fails because someone was
mucking with the script. So we’re not going to do that.
Instead, we are going to use something called Docker Compose. Docker Compose is
a project by Docker that was based on something called fig a long time ago.
Unlike the rest of their toolkit, docker-compose is a Python application that
uses YAML to describe a service or set of services. It allows you to define
pretty much every aspect of how the services are run, what the networking and
storage systems will look like, and to fine tune how your app will work via
environment variables.
There is a ton of info out there on Docker Compose 1 so please do take a
peek. For now, let’s roll forward into the unknown and create our first compose file.
deploy/master/docker-compose.yml
---# deploy/master/docker-compose.yml# Define the version of the compose file we're usingversion:'3.3'# Define our servicesservices:# Jenkins master's configurationmaster:image:modernjenkins/jenkins-masterports:-"8080:8080"volumes:-plugins:/usr/share/jenkins/ref/plugins-warfile:/usr/share/jenkins/ref/warfile# Jenkins plugins' configurationplugins:image:modernjenkins/jenkins-pluginsvolumes:-plugins:/usr/share/jenkins/ref/plugins-warfile:/usr/share/jenkins/ref/warfile# Define named volumes. These are what we use to share the data from one# container to another, thereby making our jenkins.war and plugins availablevolumes:plugins:warfile:
A compose file is made up of a few sections as in the example above. Here the
ones we’re using:
version2: Define what version of compose file this is
services3: This is where we list out all of the services that we need running.
This example is fairly straightforward, but it is possible to include any
service your app needs in this section. You’re basically describing the full
system and it’s interactions.
volumes4: This is where data storage is described. We’re using it to define
two volumes, one for plugins and one for the warfile. Upon creating this
volume, data from the container will be copied in. Since the first container
does not have anything at that path, the data from the second container is
what we get which is exactly what we want.
networks5: Not used here, but a way to define all container networking.
This is a fairly simple example of a compose file so it should be fairly
straightforward to understand. You may also notice that it’s very succinct
and to the point while still being super readable. This is why I like Docker
Compose. We can describe something extremely complex (not so much in this case)
as an easy to read YAML file.
Test it out
Ok, here’ we go girls and boys. The big reveal. Our rocket-powered-motorcycle is
fueled up and we’re ready to jump the Snake river!
PWD: ~/code/modern-jenkins
# Compose upcd deploy/master
docker-compose up -d
docker-compose logs -f
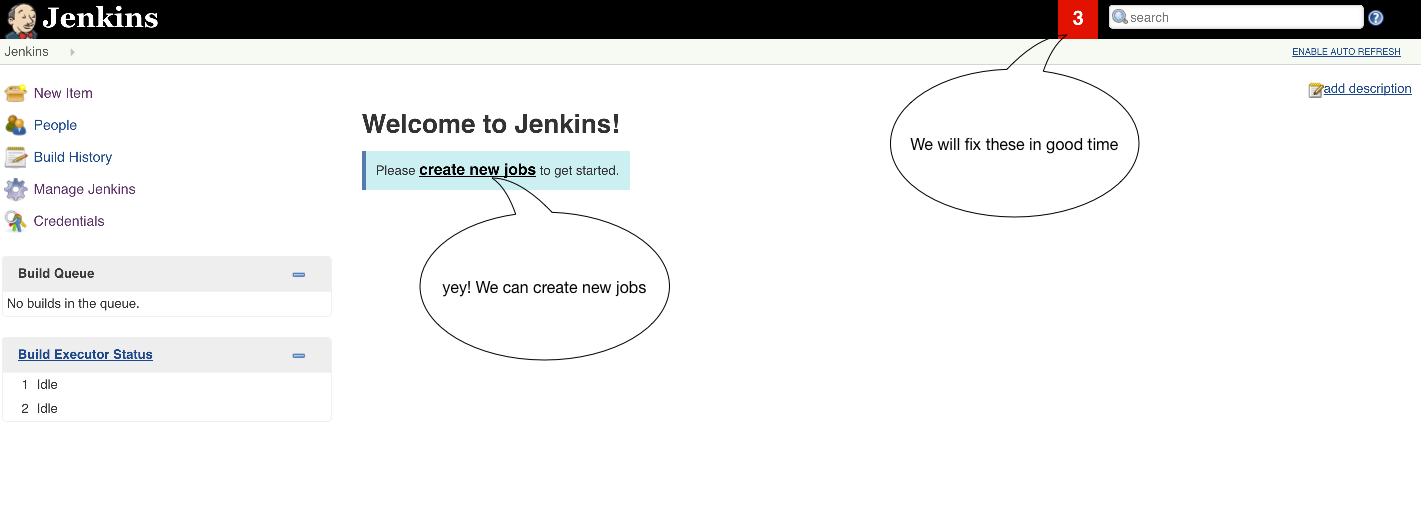
The Jenkins app should be starting up now and once it says “Jenkins is fully up
and running” you should be able to browse to the UI at
http://localhost:8080 and bask in its Janky glory.
Now that we know how to start / stop it, we should add this to the documentation.
It is important to keep these docs up to date so that anyone can jump in and
start using it without having to do a massive amount of research. Let’s add
this to the README:
deploy/README.md
# Deployment Scripts
Jenkins is deployed via Docker Compose. In order to run the service locally, use
the following commands:
```# Get into the deploy directorycd deploy/master
# Start the service as a daemon
docker-compose up -d# View logs
docker-compose logs -f# Stop Jenkins
docker-compose down -v# Pull new images
docker-compose pull
```
WTF Matt, a 6 part blog series to replace “java -jar jenkins.war” and 6 clicks?
hahaha, well you got me there! JK. While java -jar jenkins.war and a few mouse
clicks could get us to the same place, it would not have been wasting nearly
enough bits :trollface:
Obviously there are two potential reasons why we did this:
I am a crazy person
I am a just-crazy-enough person
Luckily for you, the answer is the latter. If you’ll recall, the whole reason
I’m writing this is because I’m tired of people showing me their ugly Jenkins
and encouraging me to tell them how cute it is.
The problem with most of these monstrosities is not that they don’t build the
software. If it didn’t do that it wouldn’t exist at all. The problem is that
they are extremely hard, time consuming, dangerous, and unfun to work on.
That’s fine for something that never changes, but as it turns out we’re making
things for the internet which is growing and changing constantly meaning that
we constantly need to change and adapt in order to move forward. This applies
very much so to our build system. It is a system that eventually everyone in the
company begins to rely on, from C levels that need profits to PMs and POs who
need features, to Engineers who need to do the actual work.
When a CI system turns into a bowl of spaghetti each little necessary change
becomes a nerve-racking-afterhours-signed-out-of-slack maintenance that gives
us all PTSD after the 30th time it goes south. What we are doing here is
implementing a semi-rigid structure for our system to basically manage change
effectively while still moving fast.
Let’s walk through some of the common Crappy Times at Jenkins High:
A plugin with a broken dependency: Instead of finding out after checking the
‘restart Jenkins when done’ that a plugin can’t fully resolve it’s
dependencies, we will see it when we try to build the Docker image. It is still
non-optimal that it’s happening, but it is not a prod outage and builds are
still running, preventing a Cincinnati Time Waste tournament.
Rolling credentials for the CI Git user: In the old days, this required
a ton of coordination in addition to an outage. We have not yet showed it, but
when your secrets are tied to the container we are able to modify all the
required credentials, roll the system, and get back at it.
A job that broke for “no reason”: It’s always unpleasant to be surprised
by a job that is just no longer going green. When we version all of our jobs,
plugins, and master configuration, bisecting what caused a failure
(or behavior change) becomes much simpler. We just go back to the point in
which the job was running and diff the environment to what is running today.
Since we’re able to run everything locally it should be a fairly
straightforward process to replicate the problem on your laptop and lower your MTTR.
All of these problems we are talking about are still going to occur, but what
we’re doing is pushing the problems down to build time from runtime. We want
to find these issues in advance where they are not causing outages. We want to
be able to treat our pipelines, configuration, and infrastructure as code to avoid
the bowl of spaghetti that is fragile and unkown in nature. The teams should not
be called “10ft Pole” (my old team) that help with the build system, they
should be called “Golden Retriever Puppies” because everyone wants to play with us.
In conclusion
In conclusion, I hope you are able to see how the beginnings of our system are
going to lend themselves to being a fully scalable solution that can scale to
hundreds of builds, thousands of developers, and at least 10s of different
companies you’re going to work at :)
If you don’t see it quite yet then you’re going to have to trust me that we are
indeed doing this work for something and not for nothing. Anyways, no skin off
of my nose if you don’t. Just keep typing code monkey.
In the next unit of this series we will begin configuring Jenkins. This will
allow you to begin making Jenkins do the stuff you need it to do. Stay tuned
for Unit 3 of Modern Jenkins: Programmatically Configuring Jenkins for Immutability with Groovy.
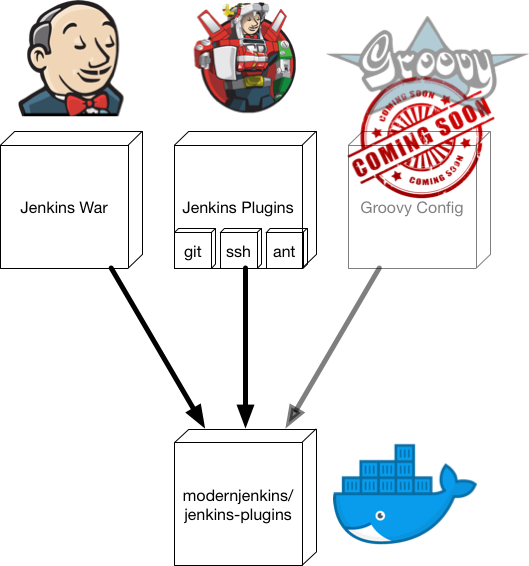
You may have noticed that while we called the previous image jenkins-master,
we never did drop the war in it. In fact, the only reference to that war we’ve
seen is the very base image which sets a version, path, and a checksum. What’s the
reason for this madness?
The answer is that the images we have built up until now are
only a runtime environment for this image. The master image (the one we just
built) will almost never change. When doing an upgrade the war never has new
system requirements and rarely changes the directory structure or anything like
that.
What does change from deployment to deployment is the set of plugins, version of
the Jenkins war, and the configuration that interacts with those things. For
this reason I choose to run a vanilla Jenkins master container (with a few
environment variable configs passed in) and a highly customized plugin
container. This plugin container is where the binaries live and is volume
mounted by the master to provide the software itself.
Let’s create it now and we can talk more about it after.
images/jenkins-plugins/Dockerfile
# images/jenkins-plugins/Dockerfile
FROM modernjenkins/jenkins-base
MAINTAINER matt@notevenremotelydorky
LABEL dockerfile_location=https://github.com/technolo-g/modern-jenkins/tree/master/images/jenkins-plugins/Dockerfile \image_name=modernjenkins/jenkins-plugins \base_image=modernjenkins/jenkins-base
# Add our plugin installation tool. Can be found here and is modified from the# upstream version.# https://raw.githubusercontent.com/technolo-g/modern-jenkins/master/images/jenkins-plugins/files/install-plugins.sh
ADD files/install-plugins.sh /usr/local/bin/
# Download the Jenkins war# JENKINS_URL, JENKINS_ROOT, JENKINS_WAR, and JENKINS_SHA are set in the parent
RUN mkdir-p${JENKINS_ROOT}/ref/warfile \&& curl -fsSL${JENKINS_URL}-o${JENKINS_WAR}\&&echo"${JENKINS_SHA}${JENKINS_WAR}" | sha256sum-c - \&&chown-R${user}:${user}${JENKINS_ROOT}# We will run all of this as the jenkins user as is dictated by the base imge
USER ${user}# Install our base set of plugins and their depdendencies that are listed in# plugins.txt
ADD files/plugins.txt /tmp/plugins-main.txt
RUN install-plugins.sh `cat /tmp/plugins-main.txt`# Export our war and plugin set as volumes
VOLUME /usr/share/jenkins/ref/plugins
VOLUME /usr/share/jenkins/ref/warfile
# It's easy to get confused when just a volume is being used, so let's just keep# the container alive for clarity. This entrypoint will keep the container# running for... infinity!
ENTRYPOINT ["sleep", "infinity"]
You can see from the Dockerfile that this image is where the action is. We have
a similar set of metadata at the top like the other images, then we add a file
named install-plugins.sh This file is from the upstream Jenkins Docker image and
it’s purpose is to install a set of plugins as well as any depdendencies they
have. It can be downloaded from the link provided in the Dockerfile 1.
Then we go on to download the jenkins war and check it’s SHA. If the SHA does
not match what we have in the base image, this step will fail and you know that
something amiss is going on. Since the version and the SHA are both set in the
very base image they should always match. There is never a scenario in which
those two do not match up.
Once the war and tools are installed we can install our set of plugins. The
install-plugins.sh script needs the war to run so now we should be ready.
What this script is doing in the background is interacting with the Jenkins
Update Center to attempt to install each plugin that is listed in plugins.txt.
It will reach out to download the plugin and check for any depdendencies the
plugin may have. If there are any, it will download those, resolve transitive
deps and so on until the full set of plugins defined by us are installed along
with any deps they need to function.
NOTE: This is different than the plugins.sh file that is out there. That
script will not resolve dependencies and makes it very hard to audit which
plugins you actually need.
PWD: ~/code/modern-jenkins/
# Add plugin resolvercd images/jenkins-plugins
mkdir-p files/
wget -O files/install-plugins.sh \
https://raw.githubusercontent.com/technolo-g/modern-jenkins/master/images/jenkins-plugins/files/install-plugins.sh
chmod +x files/install-plugins.sh
# Add a very base set of plugins to plugins.txt# Add some credential storageecho"credentials">> files/plugins.txt
# Enable GitHub interactionsecho"github">> files/plugins.txt
# Make our blue balls greenecho"greenballs">> files/plugins.txt
# Give us Groovy capabilitiesecho"groovy">> files/plugins.txt
If you recall we discussed that this image is only going to provide the software
itself and the Jenkins master image will provde the runtime. How that works is
that we will export our plugins and warfile via the VOLUME statements at the
bottom of this Dockerfile and mount them into the master via --volumes-from.
This makes our plugins image an fully contained and versionable bundle of the
master war and any plugins we need. A little later on, we will talk about how
to include your configuration as well.
Finally we have the ENTRYPOINT. This version is farily simple:
sleep infinity.
What this does is keeps the container running even though we do not have a
running process in it. Since this is only a container for our wars and JPIs,
it doesn’t need to run the JVM or anything like that. It only needs to provide
it’s exported volumes. If we were to omit the ENTRYPOINT, everything would
still work as expected but for the fact that the jenkins-plugin container
would not be running.
It would appear to be in a stopped state which for me is very confusing. The
container is being used by the master (by way of volumes) and so it
is indeed in use. The fact that Docker shows it as stopped is misleading IMO
and so this just props up the container for clarity.
Building the image
Well, we’ve got another image to build and I think by this time you know what
we’re going to do and it’s not DRY out our builders :P
PWD: ~/code/modern-jenkins/
# Warm up the copy machine...cd images/jenkins-plugins
cp-rp ../jenkins-master/build.sh .
perl -pi-e's~jenkins-master~jenkins-plugins~g' build.sh
# Build the image
./build.sh
# yay! I worked on the first time :trollface:
Testing the image
As us rafters say, the proof is at the put-in. Let’s give it a whirl!
PWD: ~/code/modern-jenkins
# Start the plugins container first
docker container run --name plugins -d modernjenkins/jenkins-plugins
# Now fire up the master
docker container run --rm-ti--volumes-from=plugins -p 8080:8080 \
modernjenkins/jenkins-master
# Open the GUI
open http://localhost:8080
Would you look at that? Jenkins seems to be starting up swimmingly! If it
is not for you, try to debug what exactly is going wrong. There are a lot of
moving parts and this is a fairly complex system so don’t feel bad. It happens
to all of us. Except us writing blog tutorials. We are always 100% right and
our instructions work 11/10 times so you’re wrong and you should feel bad :P
Seriously though, if something is jacked up in these instructions please use
your super PR skills and help a brotha out by submitting a PR to the repo.
After running tests like these, we definitely need to begin thinking about
cleanup. What would happen if we tried to run the same tests again right now?
Feel free to try it, but the secret is that it won’t work. We need to delete
the remnants from the previous test before starting another so I make it a habit
to ensure a clean environmnet before I run a test and attempt to cleanup
afterwards. The command I normally use for this is the equivalent of “nuke it
‘till it glows”: docker container rm -fv $(docker ps -qa).
This little gem will remove all containers, running or not as well as any
volumes they may have created (you may want to read more about that, volumes
not in the state you thought they were can ruin your day in lots of ways).
One other thing you may be noticing is that no matter how diligent you are,
you’re developing a stack of <none> images, weirdly named volumes, and orphaned
networks. This is normal cruft left behind while doing Docker development and it
can be removed by using docker system prune . This will remove:
all stopped containers
all volumes not used by at least one container
all networks not used by at least one container
all dangling images ('s)
NOTE: If you really want to clean up, add a -a and it will also remove
images not attached to a running container. I find that to be annoying except
when we’re in prod, but it is handy there.
(~)------------------------------------------------------------------------- 🐳 unset(matt.bajor)
% docker rm-fv$(docker ps -qa)
34b9692447f6
59b24f290270
(~)------------------------------------------------------------------------- 🐳 unset(matt.bajor)
% docker system prune
WARNING! This will remove:
- all stopped containers
- all networks not used by at least one container
- all dangling images
- all build cache
Are you sure you want to continue? [y/N] y
Deleted Networks:
master_default
Deleted Images:
untagged: modernjenkins/jenkins-master@sha256:8f4b3bcad8f8aa3a26da394ce0075c631d311ece10cf7c23ce60058a9e47f6ed
deleted: sha256:96c78f549467f8b4697b73eddd9da299d8fd686696b45190a2bba24ad810529a
deleted: sha256:d1f38cb683287825bbf1856efdfaa87e2a7c279ceb793f9831b88b850ae1c9a0
deleted: sha256:5371c45cef2d3c5c468aae4fd5e93c335e8e681f2aa366f6122902c45e8ec9cb
deleted: sha256:079be452ec3e99b51a35b76e67b1bb3af649c3357e3ba05d2b6bd2a8127804b4
deleted: sha256:87baad26b39521ddd0d7b12ac46b2f92344f2f8ad34f0f35c524d5c0c566b409
deleted: sha256:c348763948964e1f63c427bea6b4d38c3a34403b61aee5e7b32059a3c095af32
deleted: sha256:6f92439bdac179e8c980dc6a7eb4f9647545e9c6d34d28edbba3c922efa9ea1e
deleted: sha256:edd5cbd4dc3cb3e9ab54bb1d7f446d5638c4543f04f2b63ae1a3e87a661be7a2
deleted: sha256:7890def677cf6649567c4355ef8f10c359f71c0ac9ca6ab94d8f359a5d57f84d
deleted: sha256:2704ec820811576ee2c60b8a660753939457f88fbe6938c2039489a6047ec59c
deleted: sha256:202acc3c794ce58a5e0b0e6b3285ab5ae27c641804c905a50b9ca7d5c601b2b3
deleted: sha256:70e19603643ce03f9cbff3a8837f1ebfb33fe13df7fba66c2501be96d9a2fb93
deleted: sha256:8e757cb858613c81e5fa8fb2426d22584539c163ce4ab66d6b77bd378ee2817a
deleted: sha256:18d1a064d790f3be371fef00813efe1c78996eab042977b952f4cbf067b846e8
deleted: sha256:bddcbf75436ff49e435fe3c371337b6b12ae125e68e0d833ac6180ffd82f34d9
deleted: sha256:f4dae60dcb2542e532eb05c94abba2da00d5a36360cb1d79cb32f87bf9b9c909
deleted: sha256:12f7c2589fdbb6e8b9ac78983511df70e9613c8da42edf23ee1cdb3599437233
deleted: sha256:26b155d41fabd6881f871945586c623a485688fc67f08223df288522f7aeed87
deleted: sha256:3a7c393698419b8f4f7a1464264459d2662d9015b3d577ad8cb12e0b4ae069a5
deleted: sha256:53794a3680b75ae98f70ab567db86a1b0e262615a8194bad534edfd5d8acc2f2
deleted: sha256:13449dedb3ec5df1f1b969aa2f1f93bb2a3bed2fb3ebe7279cce52b750696031
deleted: sha256:55aae84cda94b4611f73ec70b4cc1ea7ce4bbb77a1999b585fcc46c6239fe2a5
deleted: sha256:b41674288931c4e4bcd43e9fcc0d0af8d9ddd9a31f04506050ce0f0dfc59e3e3
Total reclaimed space: 313.9MB
Commit, push, PR
You know the drill. Integrate early, integrate often. Make sure you actually are
looking at the work you’re merging. Afterall, it has your public name on it twice.


 Image from Simpsons Mathematics